

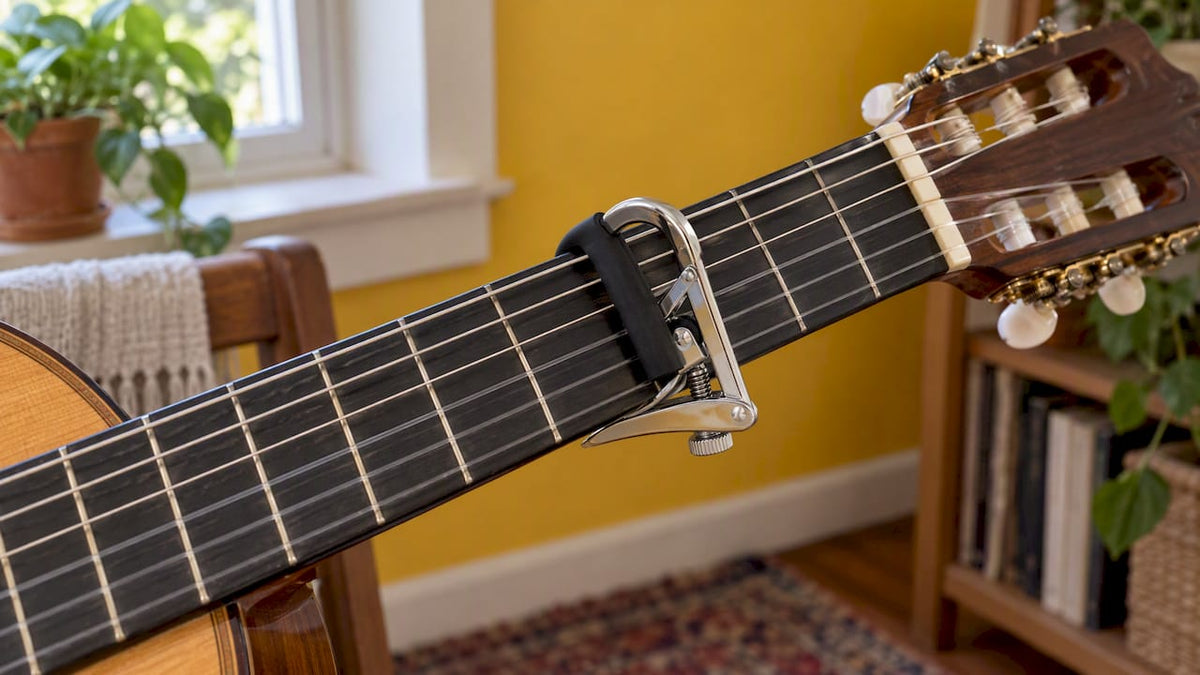
To put a capo on a guitar, tune up first, pick the fret your chart asks for, then clamp the capo across all six strings just behind that fret, on the nut side of the metal wire, with the bar parallel to the fret. Use just enough pressure for every string to ring, then check the tuning again. That is the whole method. The rest of this guide covers the details that separate a clean sound from a buzzy, sharp one: exactly where the bar goes, how much squeeze is right, what each fret does to your chords, and how to fix the usual problems.
Table of Contents
- The short version
- What a capo actually does
- Step by step: putting the capo on properly
- How much pressure is right?
- Choosing the right capo for your guitar
- What each fret does to your chords
- Is a capo good for beginners?
- Common mistakes
- What to check after you put it on
- Our view: set the guitar up for the capo
- Capos, strings and setups at MusicStreet
- Frequently asked questions
- Sources
The short version
- Tune the guitar with no capo on.
- Count the fret from the nut. The first fret is the one nearest the headstock.
- Open the capo, place it just behind the fret wire, bar parallel to the fret.
- Release it so it grips evenly across all six strings.
- Pick each string one at a time. Fix any buzz or dead note.
- Retune slightly if needed, then play your usual chord shapes.
Everything below explains why each step matters.
What a capo actually does
A capo works like a movable nut. Yamaha’s guitar team describes it as a new nut that raises the pitch of the open strings by one semitone per fret, so you can keep playing chord shapes you already know without learning new ones or fighting through barre chords.
That is why capos are so popular with beginners and songwriters alike. A song written in a key full of sharps and flats can often be played with simple open shapes, because the capo does the transposing for you. You play the G shape you learnt in week one; the audience hears a different key.
Step by step: putting the capo on properly
1. Tune first
Tune the guitar open, with no capo, before you clamp anything. If you tune with the capo already on, you are tuning a shortened instrument and will end up with the open-string tuning off once you remove it. Use a clip-on tuner or a tuner pedal, and take your time with the thicker strings.
2. Choose the fret
Count from the nut towards the body. If a chart says “capo 3”, the capo goes at the third fret. If you are choosing your own key to suit your voice, see the fret table later in this guide.
3. Place it just behind the fret wire
The capo should sit close to the metal fret bar, but on the nut side of it, not on top of the wire and not floating in the middle of the gap. D’Addario’s UK guidance says the capo belongs just behind the chosen fret, not between frets or on top of one, because that gives a clear tone without buzzing or rattling.
The best way to think about it is that the capo is a stand-in for your finger. When you fret a note by hand you press just behind the wire, never on top of it. The capo should do the same job in the same spot.
G7th, who build capos, explain the physics: placing the capo close behind the fret reduces how far the strings have to be pushed, which limits the sharpening that creeps in when a capo sits further back in the gap.
4. Keep the bar parallel
A capo that sits slightly slanted will press one side of the neck harder than the other. You will usually hear this as one string buzzing while another sounds fine, or as the top and bottom strings going out of tune with each other. Look along the neck and check that the bar runs in line with the fret.
5. Release and let it clamp
With a spring or trigger capo, squeeze the handle to open it, drop it on at the right spot, then release gently so it settles. Kyser’s guidance is the same: open it, position it just behind your chosen fret, and release the handle so it clamps down evenly. Avoid dragging the capo into place across the strings, as it can pull them sideways.
6. Check every string
Play each string separately and listen. Kyser recommends checking each string individually, then adjusting to clear any dead or buzzing notes. Then strum an open chord. If it sounds sour, retune with the capo on, a few cents at a time, rather than cranking the pegs.

How much pressure is right?
Too little and strings buzz. Too much and the notes go sharp. D’Addario puts it simply: too little pressure causes buzzing, while too much pulls the strings out of tune.
The aim is the lightest squeeze that lets every string ring. If your capo has an adjustable screw or tension knob, wind it in a little at a time. Shubb, who make screw-adjusted capos, say that applying the capo from above or below the neck is a matter of preference; what matters more is using only as much pressure as needed, sitting close behind the fret, and applying it straight on without shoving the strings sideways.
If it buzzes
- Nudge the capo a millimetre or two closer to the fret wire, or a touch further back, and test again. Kyser suggests this small adjustment to get even, clean pressure.
- Check that the bar is parallel to the fret.
- Add a little pressure, or tighten the adjuster slightly.
- Check that the capo’s pad is not worn or flattened.
If it sounds sharp
- Ease off the pressure.
- Move the capo closer to the fret wire.
- Retune with the capo on.
- If every capo you try pulls the guitar sharp, the problem may be the guitar. Yamaha’s specialists note that a high nut setting means more pressure is needed to fret the strings, which pulls them sharp. That is a job for a proper setup rather than a better capo.
Choosing the right capo for your guitar
Neck shape matters. Most steel-string acoustics and electrics have a curved fingerboard, and a capo built for that radius will sit snugly. Classical and Spanish guitars have wider, flatter necks, so they need a capo made for that profile. Twelve-string guitars need a capo designed for the extra strings.
A few examples from our range:
- For steel-string acoustics and electrics, the Shubb C1 acoustic capo in chrome is a screw-adjusted design that lets you set the tension once and then clip it on and off.
- For nylon-string guitars, the Shubb C2 classical capo and the G7th Nashville classical capo are made for the wider neck.
- For twelve-strings, the Shubb C3 twelve-string capo covers the extra courses.
- If you want a quick one-handed trigger-style capo, the Mojo MCP-7 acoustic-electric capo is an option worth a look.
If you play a ukulele or banjo, the G7th Newport capo for ukulele and banjo is made for the smaller neck.
What each fret does to your chords
Every fret you climb raises the pitch by one semitone, as Yamaha’s explanation above confirms. That means you can work out the sounding key with simple counting: take the name of the shape you are playing and count up that many semitones.
Here is a worked example with the capo on the third fret, so three semitones up:
| Shape you play | Sounds as |
|---|---|
| C | E♭ |
| A | C |
| G | B♭ |
| D | F |
| E | G |
The same pattern is described by guitar teacher David Harsh, who explains that with a capo on the third fret, A shapes sound in C, D shapes in F and E shapes in G. So a song in C major, played with a capo on the 3rd fret, sounds in E♭ major, which is why people ask what key a capo on the third fret gives: the answer depends on the shapes you play, but it is always three semitones above them.
Where should the capo go for the key of A?
Work backwards. You want the sound to be A, and you want easy open shapes. Count how many semitones lie between your shape and A:
| Open shape you want to play | Capo fret | Sounds in |
|---|---|---|
| G | 2nd | A |
| E | 5th | A |
| D | 7th | A |
| C | 9th | A |
| A | no capo | A |
The 2nd fret with G shapes is the friendliest for most singers and beginners. The 7th fret with D shapes gives a bright, high sound that suits fingerstyle and mandolin-like parts, though the high position can be a stretch on a big-bodied guitar.
How to pick the fret for your voice
- Sing the song without the guitar. Find the key that sits comfortably.
- Pick a chord family you like playing: G, C, D, A or E shapes.
- Count the semitones between that shape and the key you want. That is your capo fret.
- Test it. If the song sits too high or too low, move the capo a fret either way and use the same shapes.
Moving the capo shifts the whole instrument up or down, so you can use the same chord shapes in different keys without relearning any fingerings.
Is a capo good for beginners?
Yes, with one condition. A capo lets you stay with open chords such as G, C, D, Em and Am, and move them into different keys, which is far easier than learning barre chords in your first months. The condition is that you place it accurately and retune afterwards. A beginner who clamps it on crooked and never checks the tuning will hear every chord as wrong and conclude it is their playing.
The cleanest way to build the habit is to practise the placement itself. Our companion piece, three beginner drills for clean changes with a capo, turns it into a short routine. If you want the longer reference on fret choice and tuning, see our guide to using a capo: fit, fret choice and tuning or the one on placement, tuning and chord shapes.
Common mistakes
Putting the capo on top of the fret
The bar presses the string onto the metal wire, deadening it or making it clank. Move it back until it sits just behind the wire.
Placing it in the middle of the gap
It looks tidy but forces the strings to travel further, which makes them sharper and increases the pressure needed. Closer to the wire is better, as the G7th explanation above makes clear.
Tuning with the capo off, then forgetting to recheck
Putting a capo on can move the tuning slightly, particularly on the top strings. A quick check takes seconds.
Leaving the capo clamped on overnight
A capo left under tension on the neck is not good for the strings, and a screw-type capo left tight can leave marks in the pad. Take it off when you finish playing and store it somewhere it will not get knocked.
Using the wrong capo for the neck
A curved-radius capo on a flat classical neck will not seat evenly and leaves outer strings buzzing. Match the capo to the guitar.
Pushing the strings sideways
Sliding the capo on at an angle drags the strings across the fretboard. Drop it on straight, as Shubb recommends.
What to check after you put it on
Run through this quick list every time:
- Every open string rings clearly.
- No string is sharp compared with the others.
- A chord strummed across all six strings sounds in tune.
- The capo is not catching your fretting hand when you move to the chord.
- When you move the capo up the neck, you recheck the first chord, because the closer frets are narrower and the best spot shifts slightly.
On higher frets the gaps get narrower, so the placement window shrinks. It is worth taking an extra second at the 7th fret and above.
Our view: set the guitar up for the capo
We look at every guitar that comes through our workshop before it goes on sale, and the most common reason people tell us a capo “does not work” is not the capo. It is the guitar. Strings sitting too high at the nut, a neck with too much relief, or a fretboard with a few high frets will all make a capo harder to use, and every fret you climb makes it more noticeable.

Our advice is practical. Try your capo on several frets and listen for the pattern. If the guitar goes sharp at every position, or buzzes on the same strings wherever you clamp, bring it to us. A proper setup, with the nut slots and action looked at properly, usually transforms how a capo behaves. A good capo is a small purchase, and a good setup is what lets it do its job.
For a beginner, we suggest spending the first week with just one capo and one song, and learning the placement until it is automatic. Everything else, including alternate keys and partial capos, builds on that.
— Music
Capos, strings and setups at MusicStreet
If you need a capo that suits your guitar, browse our guitar accessories, including the Kyser partial acoustic capo in black. Fresh strings also make a capo sound better, since worn strings go dull and hard to tune; see our guitar strings and in-store restring service. If your guitar buzzes or goes sharp with any capo, our team offers guitar setups, servicing and repairs at our shop in Huntingdon, Cambridgeshire. You can also try instruments in store, or start from our home page.

Frequently asked questions
What key is a capo on the 3rd fret?
A capo on the third fret raises everything by three semitones. The key you hear is three semitones above the shape you play, so C shapes sound in E♭, A shapes in C, G shapes in B♭, D shapes in F and E shapes in G.
Where should I put my capo for the key of A?
For open chords, put it on the 2nd fret and play G shapes, or on the 5th fret with E shapes, the 7th with D shapes or the 9th with C shapes. The 2nd fret with G shapes is the easiest starting point for most players.
Is a capo only for beginners?
No. Capos suit players at every level. They let you change key to fit a singer, play in keys with awkward open shapes, and create different voicings and a brighter tone higher up the neck. Professional players use them constantly.
Why does my guitar sound out of tune with a capo on?
Usually there is too much pressure, or the capo sits too far from the fret wire or at a slant. Ease the pressure, move it closer to the wire, and retune with it on. If the problem follows you at every fret, the nut height may be too high and a setup is the fix.
Should I tune with the capo on or off?
Tune with it off first, then put it on and check. Small corrections with the capo on are normal, but your baseline tuning should be set on the open guitar.
Sources
- How To Put a Capo on a Guitar, D’Addario
- Beginner’s Guide to Using Kyser Capos Effortlessly
- Applying The Capo, Shubb Capos
- Capo Physics: Positioning your capo, G7th
- The Art of Using a Capo, Yamaha Music
- How to Unlock Your Fretboard With Your Capo





Share:
Unity Gain Amplifier: How a Voltage Follower Works