
A guitar’s frets can collect more grime and finger oils than you might expect, and neglecting them could affect sound and playability. Whether you play daily or just on weekends, clean frets help keep your instrument in top shape. With a thoughtful routine and some simple supplies, you can restore shine and smoothness so every note rings true and your guitar stays comfortable under your fingers.
Table of Contents
- Step 1: Prepare Your Workspace And Gather Supplies
- Step 2: Remove Strings And Protect The Fretboard
- Step 3: Apply Safe Cleaning Solutions To Frets
- Step 4: Polish Frets For A Smooth Finish
- Step 5: Inspect Frets And Restring Your Guitar
Quick Summary
| Key Point | Explanation |
|---|---|
| 1. Prepare a clean workspace. | Organize a well-lit area with a soft cloth to protect your guitar and ensure a smooth cleaning process. |
| 2. Remove strings carefully. | Loosen and unwind each string gently to avoid scratches, protecting the fretboard for cleaning. |
| 3. Use naphtha for cleaning frets. | Apply a minimal amount of naphtha with a soft cloth to effectively remove grime without damaging the wood. |
| 4. Polish frets with Micro-Mesh pads. | Gradually use higher grit pads to achieve a smooth, mirror-like finish that enhances playability. |
| 5. Inspect and restring your guitar. | Check for smoothness and evenness of frets, then carefully restring and tune your guitar for optimal performance. |
Step 1: Prepare Your Workspace and Gather Supplies
Before diving into fret cleaning, you’ll need to set up a clean organised workspace that protects both your guitar and your working surface. According to zager.com, having the right supplies ready is crucial for an effective cleaning process.
Start by selecting a well-lit area with a flat surface like a sturdy table or workbench. Cover this surface with a soft, clean towel or cloth to prevent any scratches on your guitar’s finish. Gather your essential cleaning supplies which should include:
- Soft microfiber cloth
- Fretboard cleaner
- Soft bristled brush
- 0000 steel wool (optional)
- Fretboard conditioner or specialised guitar oil
- Work gloves (recommended)
Arrange these items within easy reach before you begin. Pro tip: work in a space with good ventilation and avoid areas with excessive dust or potential debris that might contaminate your cleaning process. Your careful preparation will help ensure a smooth and effective guitar maintenance routine.
Once your workspace is ready and supplies are assembled, you’re prepared to move on to the detailed fret cleaning process.
Step 2: Remove Strings and Protect the Fretboard
Now that your workspace is prepared, it is time to carefully remove the guitar strings and prepare the fretboard for thorough cleaning. When removing the strings, work systematically and gently to avoid accidentally scratching or damaging your instrument.
Begin by loosening the strings using the tuning pegs until they have enough slack to be easily removed. Carefully unwind each string from its tuning peg and pull it through the bridge, taking care not to scratch the guitar’s surface. As recommended by MusicRadar, when working with unfinished dark woods like rosewood or ebony, you will want to take special precautions during this process.
Before proceeding with cleaning, protect your fretboard by ensuring you are working in a well ventilated area. For unfinished woods, a small amount of naphtha can effectively remove accumulated finger oils, but exercise extreme caution. Avoid open flames and work carefully to prevent any potential damage to the wood.
With the strings removed and the fretboard exposed, you are now ready to move on to the detailed cleaning process. Check out our guide on changing guitar strings for additional insights into string maintenance and replacement.
Step 3: Apply Safe Cleaning Solutions to Frets
With your guitar strings removed and fretboard exposed, you are now ready to begin the delicate process of cleaning your guitar frets. This stage requires precision, patience, and the right cleaning approach to restore your instrument’s pristine condition.
According to MusicRadar, naphtha (lighter fluid) can be an effective solution for breaking down accumulated finger oils and grime from your frets. When applying this solution, work carefully and sparingly. Use a clean soft cloth and apply a minimal amount of naphtha, ensuring you are in a well ventilated area to prevent any potential hazards.
Begin by gently rubbing the naphtha-dampened cloth across each fret, moving systematically from the top of the neck to the bottom. Pay special attention to areas with visible dirt or discolouration. The goal is to lift away grime without saturating the wood or leaving excessive liquid behind. Learn more about keeping your guitar in top condition with our quick maintenance tips, which can help prevent build-up between deep cleaning sessions.
Work slowly and methodically, using light pressure and allowing each section to dry completely before moving to the next.
 Your careful approach will help maintain the integrity of your instrument while restoring its original shine and playability.
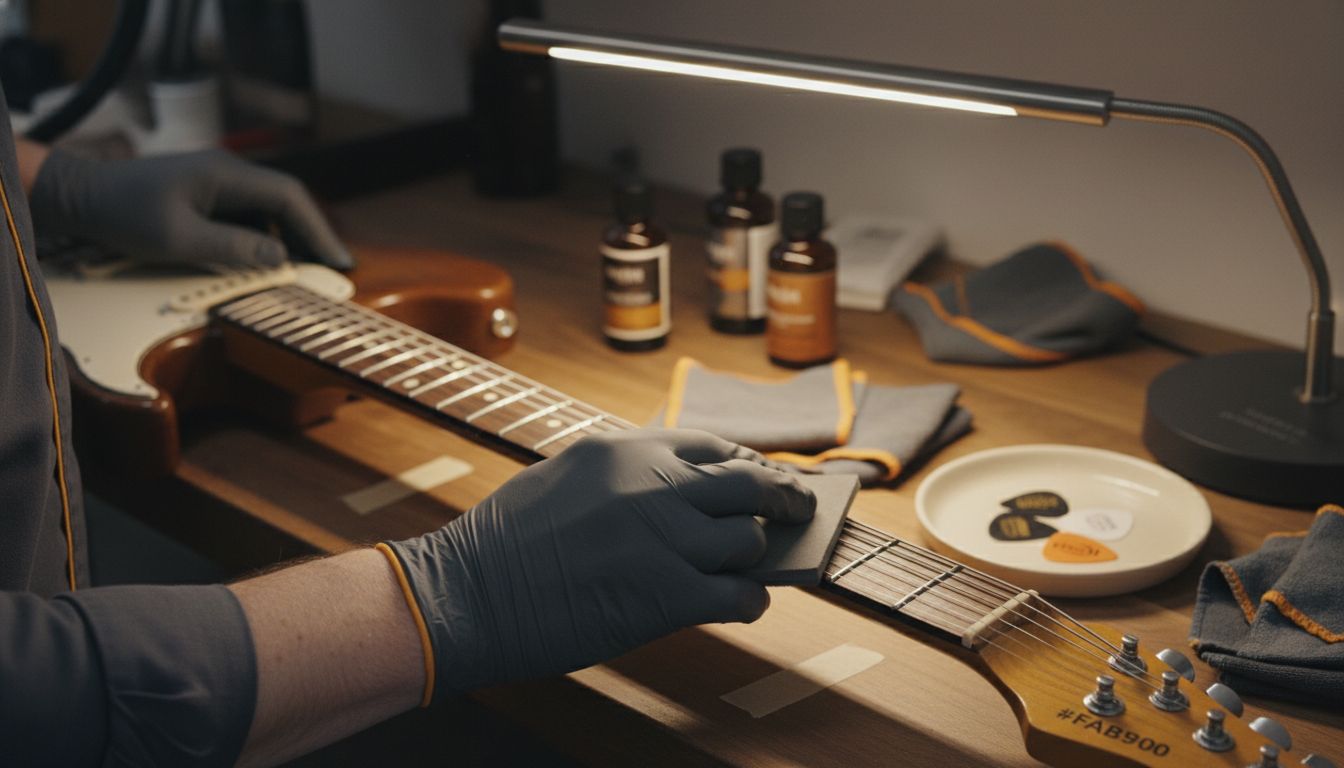
Step 4: Polish Frets for a Smooth Finish
With your frets cleaned and prepared, it is time to transform them from merely clean to professionally polished. This final stage will not only enhance the aesthetic appeal of your guitar but also improve its overall playability and feel.
According to MusicRadar, achieving a professional finish requires using Micro-Mesh pads in a strategic progression of ascending grits. Start with a lower grit pad around 1,000 and systematically work your way up to higher grits like 12,000. This gradual approach will help you create a mirror-like finish that looks stunning and feels incredibly smooth under your fingers.
Begin by gently rubbing each fret with consistent pressure, moving in one direction to ensure an even polish. Take your time and be meticulous. Work slowly from the first fret to the last, ensuring you maintain uniform pressure and movement. Learn how to maintain your guitar’s pristine condition with our comprehensive cleaning guide, which offers additional insights into instrument care.
Once you have completed polishing, run your fingers gently across the frets to check for smoothness. A perfectly polished fretboard will feel silky and seamless, dramatically improving your playing experience and the overall feel of your instrument.
Step 5: Inspect Frets and Restring Your Guitar
With your frets polished to perfection, the final stage of your guitar maintenance journey involves a meticulous inspection and careful restringing. This critical step ensures that all your previous hard work translates into improved playability and sound quality.
According to Guitar Noise, after polishing, you must carefully inspect each fret for uniformity and smoothness. Run your fingertips gently across the fretboard, checking for any remaining rough spots or uneven areas. Any imperfections you detect should be carefully smoothed out using your polishing materials.
Next, prepare to restring your guitar with precision. Remove any protective tape or fret masks from earlier stages of the cleaning process. Learn the optimal technique for restringing your guitar with our comprehensive guide, which will help you achieve the best possible sound and feel.
Once your new strings are in place, tune the guitar carefully and play through several chords and scales. This final test will confirm that your maintenance efforts have successfully enhanced the instrument’s overall performance and playability.
Listen for clarity, feel the smoothness of the frets, and enjoy the renewed responsiveness of your guitar.
Keep Your Frets Pristine with Expert Support from MusicStreet
Struggling to maintain your guitar frets and achieve that smooth, polished feel can be frustrating. This article highlights key challenges like safely cleaning delicate fretboards, avoiding damage to unfinished woods, and restoring fret shine to improve playability. Whether it is removing grime with naphtha or polishing with micro-mesh pads, the process demands precision, patience and the right tools.

At MusicStreet, we understand your dedication to preserving your instrument’s condition and enhancing your playing experience. Explore our carefully selected range of premium guitar care products and accessories to make your maintenance routine effortless. Ready to upgrade your setup with high quality guitars and expert advice? Visit MusicStreet.co.uk today and discover guides like How to Change Guitar Strings and How to Restring a Guitar Guide to support your journey. Take control of your guitar care with MusicStreet and keep your frets playing smooth and bright for years to come.

Frequently Asked Questions
How do I prepare my workspace for cleaning guitar frets?
To prepare your workspace for cleaning guitar frets, choose a well-lit area with a flat surface and cover it with a soft towel to prevent scratches. Gather essential supplies like a microfiber cloth and fretboard cleaner, placing them within easy reach.
What steps should I follow to remove strings before cleaning guitar frets?
To remove strings, start by loosening them with the tuning pegs until there’s enough slack. Carefully unwind each string from the peg and pull it through the bridge, making sure not to scratch the guitar’s surface.
What cleaning solution is best for cleaning guitar frets?
Naphtha is an effective cleaning solution for removing finger oils and grime from guitar frets. Use a naphtha-dampened cloth, applying it sparingly to rub each fret gently without saturating the wood.
How can I polish guitar frets after cleaning?
To polish guitar frets, use Micro-Mesh pads starting with a lower grit, like 1,000, and progress to higher grits up to 12,000. Gently rub each fret in one direction to achieve a smooth, mirror-like finish.
What should I check during the final inspection of my cleaned frets?
During the final inspection, run your fingers across each fret to check for smoothness and uniformity. If you find rough spots, carefully smooth them out using your polishing materials before restringing the guitar.
How do I properly restring my guitar after cleaning the frets?
To restring your guitar, first remove any protective tape from the frets, then install new strings methodically, ensuring they are properly wound around the tuning pegs. Tune the guitar and play a few chords to test the improved playability and sound.


Share:
Best 7 Electric Guitar and Amp for Beginners – Expert Comparison 2025
Active vs Passive Pickups Explained: Complete Guide