


Your minimum viable studio is five things: a computer, an audio interface, one decent microphone, a set of headphones or monitors, and a DAW to record into. Before you buy anything else, spend on your room and a clean interface, not a flashier microphone. A workable starter setup runs roughly £250 to £500, and every pound beyond that should go where it’s audible.
- A basic recording studio costs between £250 and £500, emphasizing room treatment and interface quality over microphone upgrades.
- Proper room selection, acoustic treatment, and monitor placement are crucial for high-quality recordings and should be prioritized before investing in expensive gear.
- Essential setup steps include installing drivers, connecting gear correctly, setting appropriate levels, and positioning the microphone for the source.
- Budget tiers guide upgrades, with the starter kit including a two-input interface, one microphone, and basic acoustic treatment, expanding logically as needs grow.
- Routine maintenance, proper cabling, and backing up projects prevent common issues and safeguard recordings from data loss or hardware failures.
Table of Contents
- How to set up a recording studio: the essential gear explained
- Choosing the space and basic room acoustics
- Acoustic treatment: what to fix first, and what it costs
- Monitor placement and how to combine monitors with headphones
- Cabling, gain staging and how to avoid unwanted noise
- Step-by-step setup checklist for your first recording
- Starter budgets and where to spend next as you grow
- Common mistakes, quick troubleshooting and routine maintenance
- Musicstreet’s hands-on experience with home studio setups
- Soundproofing techniques to minimise external noise
- Software plugins and effects: what you actually need at the start
- Workflow tips for smoother recording and mixing sessions
- Backup and data management for your recordings
- Author perspective: start small, learn fast
- Practical kit picks and services from Musicstreet
- Sources
- FAQ
How to set up a recording studio: the essential gear explained
Every recording chain does the same five jobs, whether you’re tracking an acoustic guitar in a spare room or building out a proper project studio. Get these right and everything else is refinement.
Your computer just needs enough processing power to run a few plugins without crackling. Most laptops from the last four years manage fine for solo recording; you don’t need a workstation unless you’re stacking dozens of tracks with heavy virtual instruments. The audio interface matters more than people expect. It converts your microphone’s analogue signal into something your computer understands, and a cheap or noisy one will colour every recording you make regardless of how good your mic is. Abbey Road’s beginner studio set-up guide recommends starting with one mic input and one instrument or line input, which covers vocals-plus-guitar sessions without overspending on channels you won’t use yet.
For the microphone, a single large-diaphragm condenser handles vocals, acoustic guitar, and most voiceover work. Dynamic mics suit loud sources and untreated rooms because they reject more ambient noise. Headphones or monitors come next, and closed-back headphones are the safer first purchase since they don’t need room treatment to sound trustworthy. The DAW (digital audio workstation) is the software where you record, edit, and mix. MusicRadar’s guide to beginner DAWs points beginners toward Pro Tools for recording-focused workflows, Ableton Live for production and looping, or Reaper for its low cost and flexibility. Pick one and learn it properly rather than hopping between three.
A MIDI controller is optional at the start unless you’re programming drums, synths, or virtual instruments, in which case even a basic 25-key controller unlocks a lot.
Before you check out, run through this:
- Does the interface have at least one XLR input with phantom power for condenser mics?
- How many simultaneous inputs do you actually need right now, not eventually?
- What’s the round-trip latency at your preferred buffer size?
- Does the DAW you’ve chosen come bundled free with the interface (many do)?
- Will the headphones isolate enough for tracking near speakers or a noisy household?
Choosing the space and basic room acoustics
Pick a room before you pick gear, because no microphone fixes a bad space. A mid-sized bedroom with carpet, curtains, and a bit of clutter almost always beats an empty box room with bare walls and a hard floor, because soft furnishings absorb reflections that would otherwise smear your recordings. Avoid perfectly square rooms if you can. Square dimensions create standing waves that build up at specific frequencies, making bass sound boomy in some spots and thin in others. Steer clear of rooms next to busy roads, shared walls with noisy neighbours, or anywhere with a hard-working boiler.
If your space allows it, separate where you record from where you mix. A vocal booth corner away from your monitors, or even just facing a different direction, stops headphone bleed and computer fan noise contaminating a take, and stops the monitoring position from doubling as a performance space.
Three quick tests tell you what you’re working with:
- The clap test. Clap sharply in the centre of the room and listen for a metallic “zing” as the sound decays. That flutter echo signals parallel hard surfaces bouncing sound back and forth, and it’s the first thing acoustic treatment should tackle.
- The mirror method. Sit at your intended mixing position and have someone slide a mirror along the side walls at ear height. Wherever you can see your monitors in the mirror is a first-reflection point, and that’s exactly where absorption panels belong.
- The sweet-spot walk. Play a bass-heavy reference track and walk slowly around the room. Note where the bass disappears or doubles in volume. Those dead and hot spots mark where not to place your mixing chair.
Acoustic treatment: what to fix first, and what it costs
Treat the room before you treat yourself to a better microphone. Berklee’s advice on home studio building is blunt about this: targeted acoustic treatment and controlling low-frequency build-up deliver a bigger, more consistent improvement than almost any gear upgrade at the same price point. A £150 microphone in a treated room usually beats a £500 microphone in an untreated one.
Work through treatment in this order:
- Bass traps in the corners. Low frequencies pile up where walls meet, so corner placement (floor-to-ceiling if you can manage it) tackles the most stubborn problem in small rooms.
- First-reflection panels on the side walls and ceiling. These are the points your mirror test identified. Absorbing them tightens the stereo image and reduces smearing on recordings.
- An absorber panel directly behind the vocal mic. This stops sound bouncing off the wall behind the singer and re-entering the microphone as a delayed, phasey copy of itself.
Statistic Callout: A single wall or ceiling acoustic treatment typically costs £700 to £1,500 in the UK, while a full professional-standard home studio build commonly reaches £4,000 to £8,000 or more.
DIY alternatives close most of that gap for a fraction of the cost. Moving blankets hung on a curtain rail, a bookshelf packed with mismatched books, and a thick rug over a hard floor all absorb meaningful amounts of mid and high-frequency energy. They won’t touch bass build-up the way a proper trap does, but for a first pass they’re genuinely effective, and i4studio’s guide to home studio essentials backs cheap fixes like rugs and blankets as a legitimate first step rather than a compromise.
Where do you draw the line and call a professional? BestBuilders’ UK soundproofing cost data shows that full room decoupling and isolated-room builds commonly exceed £5,000, and that’s the territory where a builder’s expertise starts paying for itself, typically once you’re dealing with structural noise transfer between floors or party walls rather than simple in-room reflections.
Pro Tip: Test your DIY treatment before you commit to it permanently. Clip a moving blanket to a wall with clamps for a week and redo the clap test before you drill anything into a rented wall.
Monitor placement and how to combine monitors with headphones
Get the equilateral triangle right and you’ve solved most stereo monitoring problems before they start. Your two monitors and your head should form the three points of a triangle with equal sides, tweeters angled in and sitting at ear height when you’re seated at the mixing position. Abbey Road’s guidance treats this positioning as more important than the monitors themselves. A mid-range pair set up correctly outperforms premium monitors dumped on a desk facing the wrong way.
A few placement rules make the biggest difference:
- Pull monitors at least 20 to 30 centimetres from the back wall to reduce bass reinforcement that muddies your low end.
- Toe them in slightly so the tweeters point roughly at your ears, and keep the setup perfectly symmetrical, since even a lopsided desk throws off your stereo image.
- Use isolation pads or dedicated stands rather than resting monitors directly on a desk. Desk resonance smears transients and adds a boxy colouration you’ll mistake for the mix itself.
Headphones and monitors serve different jobs, and conflating them causes problems. Closed-back headphones are your tracking choice because they isolate sound and stop bleed reaching an open microphone. Open-back headphones give a more natural, spacious sound for mixing decisions, but they leak sound and pick up room noise, so they’re wrong for recording sessions.
Calibrate your ears before you trust either. Pick two or three reference tracks you know intimately, in the genre you’re recording, and play them at a fixed, moderate volume on your monitors. Do this regularly and your brain builds a reliable internal benchmark for how a finished mix should sound. Services that analyse tracks against genre-standard loudness and tonal balance, such as Playlist Pilot’s audio analysis for musicians, can reinforce that reference habit once you’re mixing your own material.
Cabling, gain staging and how to avoid unwanted noise
Most studio hums trace back to one lazy habit: running audio cables and power cables in the same bundle. Keep them physically separated, even if it means a longer route around the room, because Hosa Technology’s guidance on cable-related studio noise confirms that proximity between mains cabling and signal cabling is one of the most common causes of hum and buzz in home setups.
A few habits keep wiring problems from eating your session time:
- Use balanced cabling (XLR or TRS) wherever the run is longer than a metre or two. Balanced connections reject interference that unbalanced instrument cables pick up easily.
- Label every cable at both ends with tape or tags, and bundle spares with Velcro ties rather than cable ties, so you can reconfigure quickly without scissors.
- Keep one dedicated power strip for studio gear, ideally with surge protection, separate from anything else on that circuit.
Gain staging is the other half of a clean signal. Wisseloord Academy’s budget home studio guide recommends aiming for peaks around minus 12 dBFS on your interface’s input meter while tracking. That leaves headroom for transients you didn’t anticipate and keeps you well clear of digital clipping, which is unrecoverable once it happens.
Pro Tip: If you hear a hum the moment you plug in, don’t reach for a different mic first. Swap one cable at a time and retest. Nine times out of ten it’s a cable run crossing a power cable, not a faulty component.
Step-by-step setup checklist for your first recording
Work through this in order and you’ll go from boxes on the floor to a usable take without backtracking.
- Unbox and install drivers first. Install your interface’s drivers before plugging it in, then connect it directly to a USB port on your computer rather than through a hub, which can introduce latency.
- Connect the physical chain. Interface to computer, microphone into the XLR input with phantom power switched on for condensers, headphones into the interface’s output, not your computer’s.
- Set up routing in your DAW. Create a new audio track, select your interface as the input and output device in preferences, and arm the track to confirm signal is arriving.
- Test your buffer size. Start with a higher buffer (256 or 512 samples) for stability while mixing, then drop it lower (64 or 128) only when you’re tracking live and need minimal latency.
- Set your levels. Speak or play at your actual performance volume and adjust the interface’s gain knob until peaks sit around minus 12 dBFS, per the Wisseloord Academy guideline above.
- Position the microphone for the source. For vocals, sit 6 to 8 inches from a large-diaphragm condenser with a pop shield, angled slightly off axis to tame plosives and control proximity effect. For acoustic guitar, aim the mic at the 12th fret from 8 to 12 inches away, and blend in a second mic or room mic if you want more body.
- Record a test pass and listen back on headphones. Check for clipping, hum, or unexpected room noise before you commit to a full take.
- Save and back up immediately. Don’t wait until the session ends.
Starter budgets and where to spend next as you grow
Three realistic tiers cover almost everyone starting out, and the jump between them should follow leverage, not excitement.
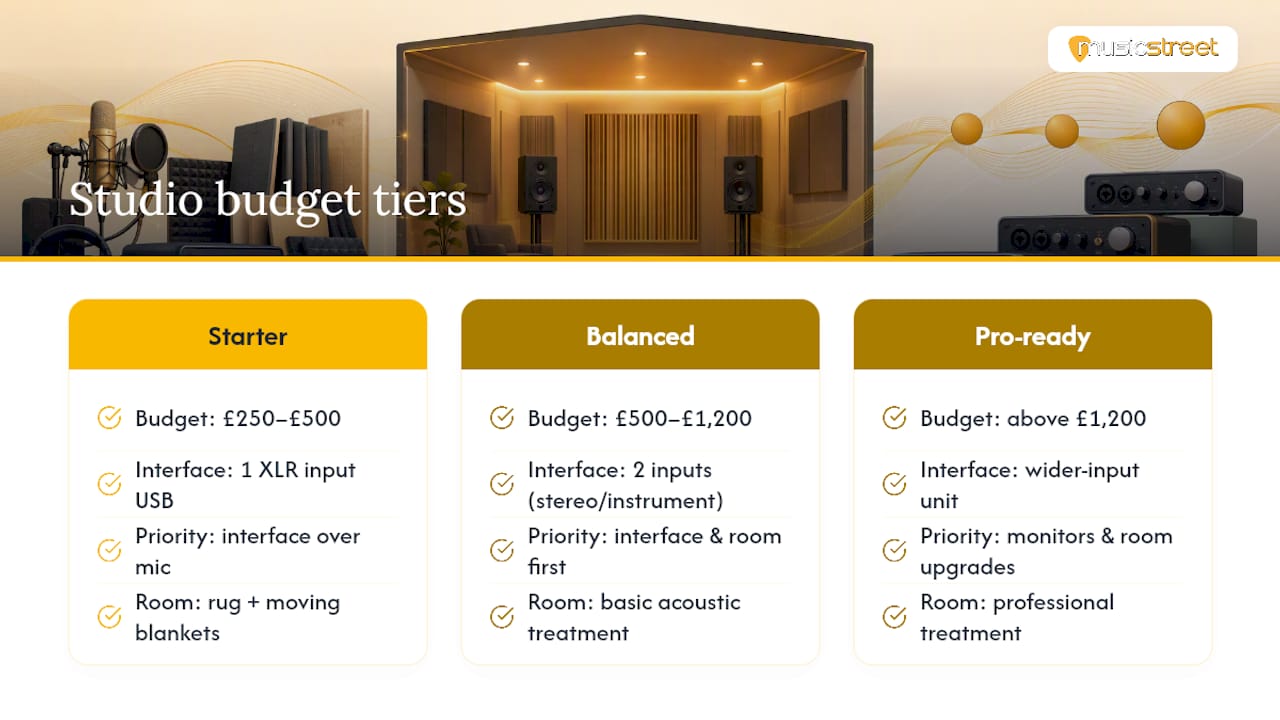
Starter tier, roughly £250 to £500: MusicProductionWiki’s budget gear research confirms this range covers a genuinely functional kit: an entry-level USB interface with one XLR input, a single large-diaphragm condenser or dynamic mic, closed-back headphones, and a free or low-cost DAW like Reaper. At this tier, interface quality matters more than mic price, because a cheap interface’s preamp noise floor will undermine even a good microphone.
Balanced tier, roughly £500 to £1,200: This is where basic acoustic treatment enters the picture, alongside a second input for stereo or instrument-plus-vocal recording, and a small step up in headphone or monitor quality. MusicProductionWiki’s staged-investment insight argues interface and room come before mic and monitor upgrades, and that ordering holds at this budget too.
Pro-ready tier, above £1,200: Here you’re adding proper studio monitors on isolation stands, a wider-input interface for multi-mic drum or band recording, professional-grade room treatment, and possibly a MIDI controller for production work.
A sensible example kit at the starter tier: a two-input USB interface, one condenser mic, closed-back headphones, a rug and a couple of moving blankets for first-pass treatment. That’s a working studio for well under £500, and our own studio recording equipment essentials guide breaks down specific product-level choices at each tier.
Common mistakes, quick troubleshooting and routine maintenance
The same handful of errors trip up nearly every beginner. Recording too hot, so peaks slam against 0 dBFS and clip, is probably the most common, closely followed by ignoring room acoustics entirely and blaming the microphone for a boomy, harsh sound the room actually caused. Skipping backups until after a disaster is the third classic, and it only takes one lost session to learn that lesson permanently.
When something sounds wrong mid-session, work through it in this order:
- Check the obvious first: is the track muted, is the interface’s gain actually turned up, is the right input selected in the DAW?
- Swap one cable at a time to isolate a noise problem rather than replacing everything at once.
- If a multi-mic recording sounds thin or hollow in the low end, run a phase check. Wisseloord Academy’s phase-alignment method has you flip polarity on one mic while listening to a mono sum; if the bass collapses, nudge the mic position or adjust timing in the DAW until it doesn’t.
Pro Tip: Set a recurring monthly reminder to update your DAW and plugins, back up your project folder to an external drive, and give your cables a visual once-over for fraying near the connectors. None of this takes more than fifteen minutes, and all of it prevents the failures that happen mid-session.
Musicstreet’s hands-on experience with home studio setups
Building a studio from a spec sheet is one thing. Getting hands-on advice from people who set up instruments every day is another, and it’s where a specialist retailer earns its keep rather than a warehouse marketplace.
Musicstreet’s in-store team inspects and sets up every instrument that passes through the shop, which means the guidance behind this article comes from repeated, practical experience with what actually goes wrong in a home setup, not just theory.
That experience maps directly onto the checklist above:
- Expert instrument inspection catches action, intonation, and electronics issues before they show up as inexplicable noise or tuning drift in a recording.
- Professional setup services get an acoustic-electric guitar or bass properly configured for direct recording, not just for playing live.
- In-store tryouts let you A/B test how an instrument actually sounds through a mic or pickup before committing, rather than guessing from a product description.
- Repair services and insurance-backed warranties mean a fault mid-project is a quick fix, not a dead session.
If you’re recording acoustic guitar specifically, our guide to recording guitar at home goes deeper on mic choice and placement for that instrument.
Soundproofing techniques to minimise external noise
Soundproofing and acoustic treatment solve different problems, and confusing the two wastes money. Treatment shapes the sound inside your room; soundproofing stops sound crossing the walls in either direction, which matters if traffic noise leaks in or your recording sessions leak out to housemates and neighbours.
Draught-proofing strips around doors and windows are the cheapest meaningful step, since gaps under a door let far more sound through than the door itself. A heavy curtain over a window, doubled up if the window faces a noisy street, cuts a surprising amount of airborne noise for very little outlay. Acoustic sealant around any gaps where cables or pipes pass through a wall closes off another common leak point.
For anything more serious, mass and decoupling do the real work. Adding a second layer of plasterboard with a decoupling compound between layers, or building a stud wall a few centimetres off the existing wall, meaningfully reduces sound transfer through a shared wall or ceiling, which is exactly the kind of job that pushes costs toward the £700 to £1,500 single-surface range or higher depending on room size and construction.
Floors deserve attention too, particularly in upstairs rooms. An acoustic underlay beneath carpet or a floating floor system reduces impact noise transferring to rooms below, which matters as much for your neighbours’ goodwill as for your recordings.
Software plugins and effects: what you actually need at the start
A DAW comes bundled with more processing than most beginners will use in the first year. Every major DAW ships with at least a compressor, an equaliser, reverb, and basic time-based effects, and that’s genuinely enough to finish a recording to a professional standard.
EQ shapes tone by boosting or cutting specific frequencies, and it’s the plugin you’ll reach for most often, whether you’re removing muddiness from a vocal or carving space for a guitar to sit alongside it. Compression controls dynamic range, evening out a performance that’s too quiet in places and too loud in others, which matters enormously for vocals and bass. Reverb adds a sense of space, simulating anything from a small room to a concert hall, and it’s easy to overuse when everything else in the mix is dry.
Beyond those three, a noise gate silences a channel when it’s not being played, which is useful for cutting bleed on a multi-mic recording. Pitch correction and de-essers solve specific vocal problems, taming sharp sibilance or tightening intonation, but they’re fix-it tools, not creative crutches to lean on instead of a good take.
Resist the urge to buy third-party plugin bundles before you’ve exhausted what came free with your DAW. Learning to get a good result from stock tools transfers directly to any premium plugin you add later, and most mixing problems are performance or placement issues that no plugin actually fixes.
Workflow tips for smoother recording and mixing sessions
A session runs smoother when recording and mixing stay separate activities, even on the same day. Recording rewards a performance mindset. Get a good take, don’t second-guess every phrase, and keep moving. Mixing rewards a critical, analytical mindset, and switching between the two constantly slows both down and tires your ears out faster.
Label and colour-code tracks as you create them rather than after the session, especially once you’re past four or five inputs. Finding “Vocal Take 3” instantly beats scrolling through unnamed tracks when you’re trying to keep momentum during a take.
Take breaks for your ears, not just your patience. Ear fatigue sets in faster than most beginners expect, usually within 45 minutes to an hour of continuous critical listening, and a fatigued ear consistently overcompensates on EQ and volume decisions. Step away, get some air, and come back to a mix with fresh perspective before finalising anything.
Commit to rough mix decisions early rather than leaving everything until a final mixing pass. Balancing levels roughly as you record, sometimes called mixing as you go, means you’re always making creative decisions against something close to how the finished track will sound, rather than against a wall of unbalanced tracks that all seem too loud or too quiet in isolation.
Backup and data management for your recordings
Lost sessions are avoidable, and the fix costs almost nothing compared with what a lost project costs you in time. The rule that matters most: never keep your only copy of a project on the same drive you recorded it to.
A practical structure looks like this. Keep active projects on your computer’s internal drive for speed while working, then back up to an external drive at the end of every session, not just at the end of a project. Add a third copy somewhere offsite, whether that’s cloud storage or a second physical drive kept away from your studio, so a single incident, theft, fire, or a failed drive, can’t wipe out everything at once.
Name project folders and session files consistently, with a date and version number, so you can tell “Vocal_Final_v3” from an earlier abandoned attempt without opening the file. Bounce a rough mix to a standard audio file (WAV or MP3) at the end of each session too, separate from your DAW project file, so you always have a listenable version even if a future software update breaks compatibility with an older project file.
Author perspective: start small, learn fast
Nobody nails their studio on the first attempt, and that’s fine. The gear you buy now should solve the problem you actually have, which for most beginners is simply getting a clean, listenable recording down, not chasing a spec sheet. Upgrade iteratively as you notice specific limitations, and don’t be shy about trying instruments and interfaces in person before buying; hearing the difference in a room beats reading a review every time. Creativity and technical investment pull against each other if you let them. The trick is spending just enough on the technical side that it stops getting in the way of the creative one.
— Music
Practical kit picks and services from Musicstreet
Musicstreet is the place to turn a checklist into an actual signal chain, because every instrument here has been inspected and set up before it reaches you, not just boxed and shipped.
If you’re recording acoustic-electric material, the Yamaha FGC-TA TransAcoustic Electro Acoustic Cutaway in Vintage Tint and its black TransAcoustic sibling both use onboard resonance to add reverb and chorus without a single pedal, useful when you’re tracking direct and want texture without extra plugins. The Yamaha FGX5 is a solid, more conventional acoustic-electric option for a cleaner direct signal. For basslines, the USED Ibanez GSR200 gives you a reliable entry point without new-instrument pricing. Once your gear is in and gigging or recording regularly, small accessories matter more than people expect: the CruzTools Groovetech Guitar Player Tech Kit, the Groovetech Acoustic Guitar Player Tech Kit, and the compact Groovetech Mini Multi-Tool let you handle string changes, action tweaks, and intonation fixes mid-session instead of losing a day to it.
Every instrument sold comes with expert setup and insurance-backed warranty support, and you can try before you buy at the Huntingdon store. Browse the full range at Musicstreet or head in for a setup consultation before your next session.
Sources
- Abbey Road’s beginner studio set-up guide
- Building a home recording studio? Here’s what you need — Berklee
FAQ
How much does it cost to build a recording studio?
A working starter setup costs roughly £250 to £500 for gear, while acoustic treatment adds £700 to £1,500 per surface if you go professional, or considerably less with DIY fixes like blankets and rugs. Full professional builds with room isolation commonly reach several thousands of pounds or more.
How do I make a simple recording studio at home?
Choose a room with soft furnishings and irregular dimensions, add basic first-reflection treatment with blankets or panels, and connect a computer, audio interface, one microphone, headphones, and a free DAW like Reaper. Abbey Road’s beginner guide confirms this five-piece chain is genuinely enough to start recording usable takes.
What equipment is needed for a recording studio setup?
The essentials are a computer, an audio interface with at least one XLR input and phantom power, a microphone, headphones or monitors, and a DAW. Everything else, MIDI controllers, extra mics, additional plugins, is an upgrade layered on top once you know what you’re missing.
Is owning a recording studio profitable?
A home studio built for personal recording and practice isn’t designed to turn a profit; it’s a creative tool. Commercial studio businesses can generate income through session bookings and mixing services, but profitability there depends heavily on location, equipment tier, and client base rather than the studio itself.


Share:
UK Buyer's Guide to Boutique & High-End Electric Guitars: Expert Advice for Selecting Premium Instruments
15 Minutes a Day to Master the Minor Pentatonic Scale for Guitarists