
Nearly every British guitarist eventually faces the challenge of finding the ideal capo for their instrument. The right choice can dramatically influence both sound quality and comfort, while the wrong one risks damaging your guitar or causing constant tuning problems. With over 60 percent of beginner players struggling to find a capo that fits properly, knowing how to select, position, and use a capo can transform your playing. This step-by-step guide delivers practical tips to help you master capo use for a richer guitar experience.
Table of Contents
- Step 1: Select The Right Capo For Your Guitar
- Step 2: Position The Capo Correctly On The Fretboard
- Step 3: Tune Your Guitar After Placing The Capo
- Step 4: Play Chords And Check Sound Quality
- Step 5: Adjust Technique For Comfortable Performance
Quick Summary
| Key Point | Explanation |
|---|---|
| 1. Choose the right capo type | Select from spring-loaded, screw-tightened, or trigger types based on your guitar’s needs and your playing style. |
| 2. Position the capo accurately | Place the capo just behind the fret and ensure even pressure on all strings to avoid buzzing and maintain intonation. |
| 3. Retune after applying the capo | Always check tuning after placing the capo as it can alter string tension, affecting pitch and sound quality. |
| 4. Test chord clarity | Play through different chords to ensure each note sounds clear; adjust capo position if notes are muted or buzzing. |
| 5. Adjust playing technique for comfort | Modify your hand position and technique when using the capo, especially at different fret placements, to reduce strain and improve playability. |
Step 1: Select the Right Capo for Your Guitar
Picking the perfect capo is crucial for achieving the best sound and playability on your guitar. When exploring capo options, you will want to consider factors like your guitar type, playing style, and the specific tonal qualities you want to achieve. Understanding what a capo is and how to use it effectively can transform your playing experience.
Most guitar players need to consider three primary capo types: spring-loaded, screw-tightened, and trigger capos. What Is a Capo? Essential Guide for Guitarists recommends selecting a capo that provides even pressure across all strings without causing tuning issues. Spring-loaded capos are typically the most user-friendly, offering quick placement and release, while trigger capos provide precise tension control. Screw-tightened capos work best for musicians who need extremely precise pressure adjustments.
When selecting your capo, ensure it matches your guitar’s neck width and curvature. Acoustic guitars often require different capos compared to electric guitars due to variations in neck profiles. Pay attention to the padding material, as high-quality silicone or rubber will protect your guitar’s finish and provide smoother string contact. Test different capos if possible, as comfort and ease of use are just as important as technical specifications.
Warning: Cheap capos can damage your guitar’s neck or cause tuning problems. Invest in a reputable brand that offers consistent pressure and protects your instrument’s finish.
Step 2: Position the Capo Correctly on the Fretboard
Positioning your capo precisely is key to maintaining excellent sound quality and preventing potential issues with your guitar. Getting this step right will ensure your chord voicings and overall musical performance remain crisp and clear.
Proper capo placement techniques emphasise positioning the capo just behind the desired fret, ensuring it sits perfectly perpendicular to the strings. This critical alignment prevents unwanted buzzing and maintains accurate intonation. When placing the capo, apply gentle but firm pressure, making certain each string is pressed evenly against the fretboard without any string muting or uneven contact.
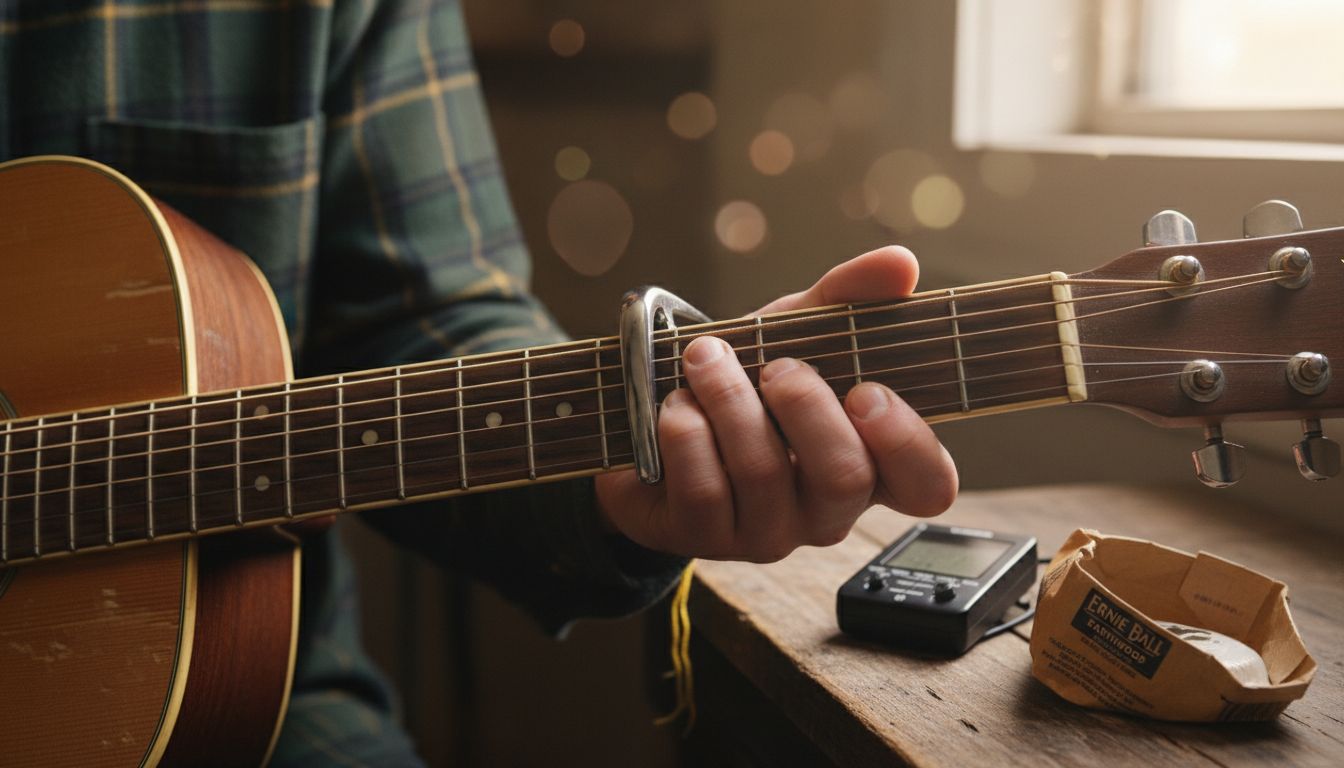
To achieve the best results, always position the capo close to the fret but not directly on top of it. This technique allows the strings to vibrate freely and produces a cleaner sound. Experiment with slight adjustments in placement to find the sweet spot that provides optimal resonance for your specific guitar. Some guitars might require more precise positioning due to variations in neck curvature or string action.
Warning: Always check your tuning after placing the capo, as the added pressure can slightly alter your guitar’s pitch. Gentle and consistent pressure is the key to maintaining both sound quality and instrument integrity.
Step 3: Tune Your Guitar After Placing the Capo
Tuning your guitar after placing the capo is a critical step that many musicians overlook. The capo can subtly shift string tension and pitch, potentially throwing your instrument slightly out of tune.
Capo tension and tuning adjustments require careful attention to ensure your guitar sounds its best. Start by using a reliable digital tuner and carefully checking each string after positioning the capo. Some strings might require minor adjustments due to the changed pressure and positioning. Guitar tuners with real-time response work best for this delicate process.
Professional guitarists recommend a systematic approach to tuning. Begin with the low E string and work your way across each string, making incremental adjustments. Guitar tuning precision becomes particularly important when using a capo, as even slight variations can impact your overall sound. Listen carefully to each note, ensuring the pitch remains true and consistent across all strings.
Warning: Always retune your guitar after changing capo position or removing the capo entirely. String tension changes can occur rapidly, and consistent tuning is key to maintaining excellent sound quality.
Step 4: Play Chords and Check Sound Quality
Playng chords with a capo requires careful attention to sound quality and precision. Your goal is to achieve clear, resonant notes that ring out beautifully across the fretboard.
Precise capo chord techniques involve methodically testing each string to ensure no buzzing or muted notes occur. Begin by playing a variety of chord shapes slowly and deliberately, listening closely to the sound quality. Perfect guitar tone selection becomes crucial when using a capo, as slight positioning changes can dramatically impact your overall sound. Focus on maintaining even pressure across all strings, which helps prevent unwanted string dampening.
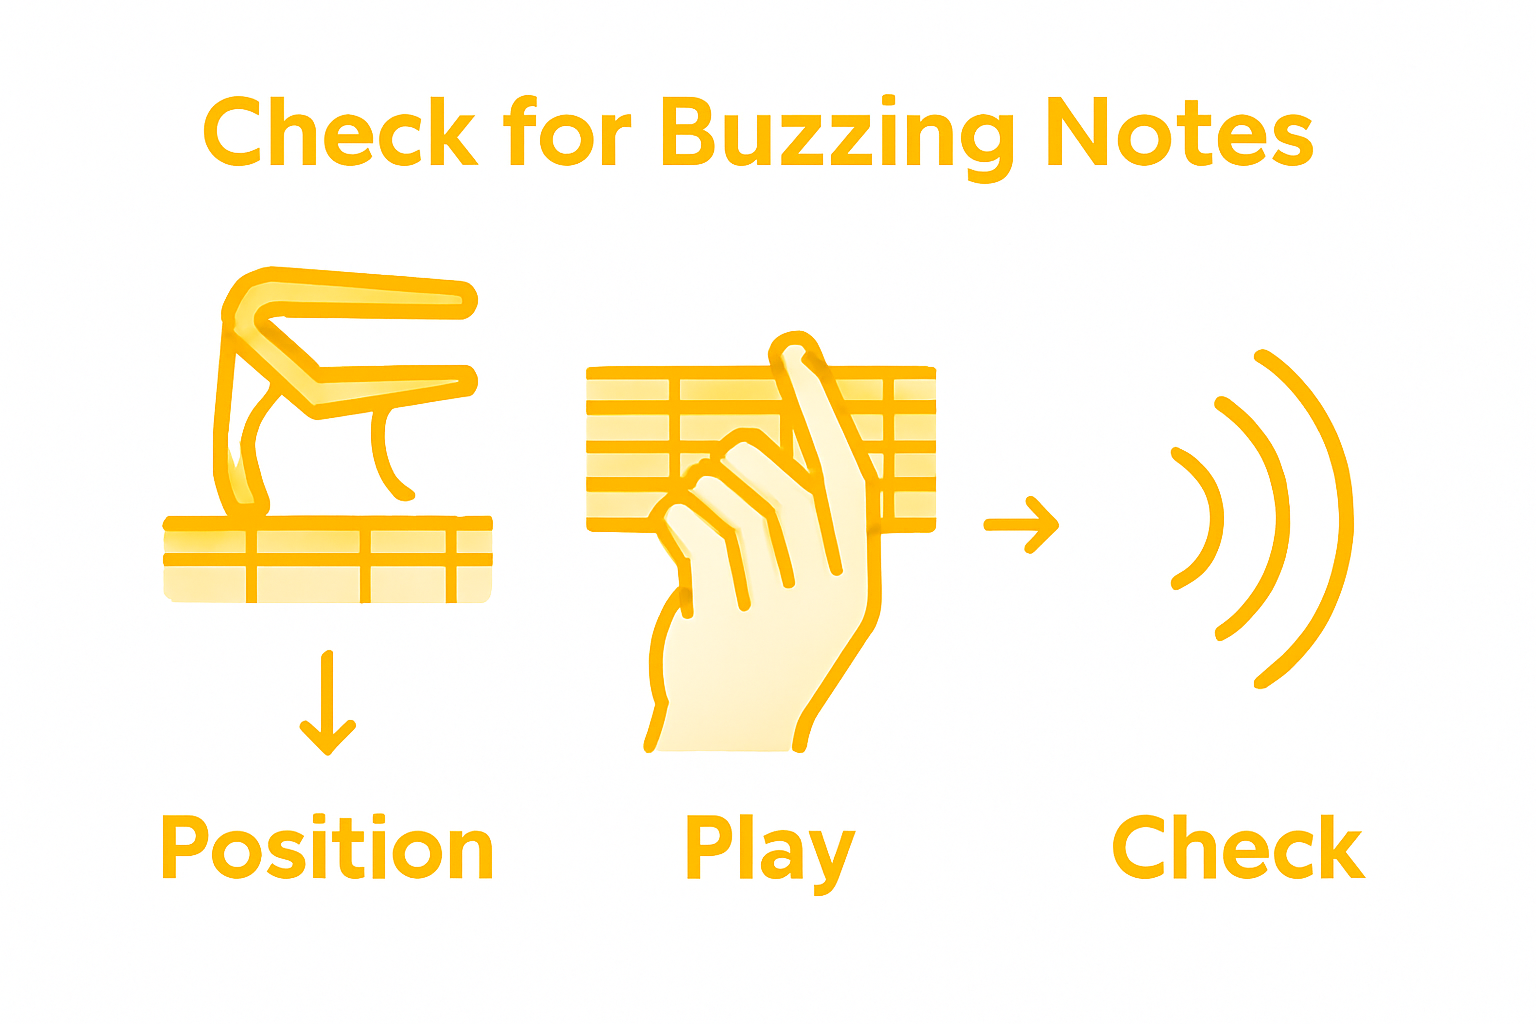
Experiment with different chord voicings and positions to find the sweetest sound. Some guitarists find that certain chord shapes work better with a capo in specific positions. Pay attention to how the capo affects your chord clarity and sustain. Try moving the capo to different frets and relearning your favourite chord progressions to discover new tonal possibilities.
Warning: Always check individual string clarity when using a capo. Uneven pressure or slight misalignment can cause some strings to sound muted or buzzy, compromising your overall performance.
Step 5: Adjust Technique for Comfortable Performance
Mastering capo usage requires more than just placement it demands adapting your playing technique for maximum comfort and sound quality. Understanding how to adjust your approach will make your guitar playing smoother and more enjoyable.
Capo positioning techniques suggest experimenting with different fret positions to improve your wrist angle and reduce strain. Beginners particularly benefit from placing the capo around the fifth fret, which can dramatically change your hand positioning and make chord transitions more comfortable. Proper hand positioning strategies involve maintaining a relaxed wrist and adjusting your grip to prevent unnecessary tension.
Practice transitioning between different capo positions to build muscle memory and flexibility. Some guitarists find that slightly changing their thumb position or adjusting their fretting hand can reduce fatigue and improve overall playing comfort. Pay attention to how different capo placements affect your reach and chord voicings, and be prepared to make subtle adjustments to your technique.
Warning: Listen to your body. If you experience any wrist pain or discomfort while playing with a capo, stop and reassess your technique. Proper technique should feel natural and pain free.
Master Your Capo Technique with the Perfect Guitar and Accessories
Using a capo effectively involves selecting the right type, positioning it precisely, and maintaining perfect tuning to avoid frustration and tuning problems. If you have struggled with uneven string pressure, unclear chord tones or discomfort during play this guide highlights vital steps such as proper capo placement and tuning adjustment to enhance your playing experience. At MusicStreet, we understand these challenges and provide expertly inspected guitars and high-quality accessories to support your journey toward flawless capo use.

Explore our collection of electric and acoustic guitars alongside premium capos and essential accessories at MusicStreet. Whether you are trying a new capo type or searching for a guitar that fits your style and neck profile, our boutique service offers personalised guidance to ensure your instrument performs beautifully every time. Don’t wait to elevate your playing comfort and tone. Visit us now and find the perfect guitar with professional setup and post-sale support tailored just for you.
Frequently Asked Questions
How do I choose the right capo for my guitar?
Choosing the right capo involves considering your guitar type and playing style. Select a capo that provides even pressure across all strings and is compatible with your guitar’s neck width and curvature.
What is the correct way to position a capo on the fretboard?
Position your capo just behind the desired fret, pressing evenly against the strings to avoid buzzing. Test and adjust the placement slightly to find the optimal position that maintains sound quality.
Why is it important to tune my guitar after placing the capo?
Tuning is crucial because the capo can shift string tension and pitch, potentially throwing your guitar out of tune. Always check each string’s pitch using a digital tuner after positioning the capo.
How can I ensure clear sound while playing chords with a capo?
To achieve clear sound, test each string while playing your chords to ensure no buzzing or muted notes occur. Maintain even pressure across the strings and adjust your technique as necessary to achieve optimal resonance.
What adjustments can I make for comfortable playing with a capo?
Adjust your technique by experimenting with different fret positions to reduce wrist strain and improve comfort. Focus on maintaining a relaxed grip and consider changing thumb positions to enhance your reach and flexibility while playing.

Share:
What Is a DI Box? Unlocking Pristine Sound Quality