

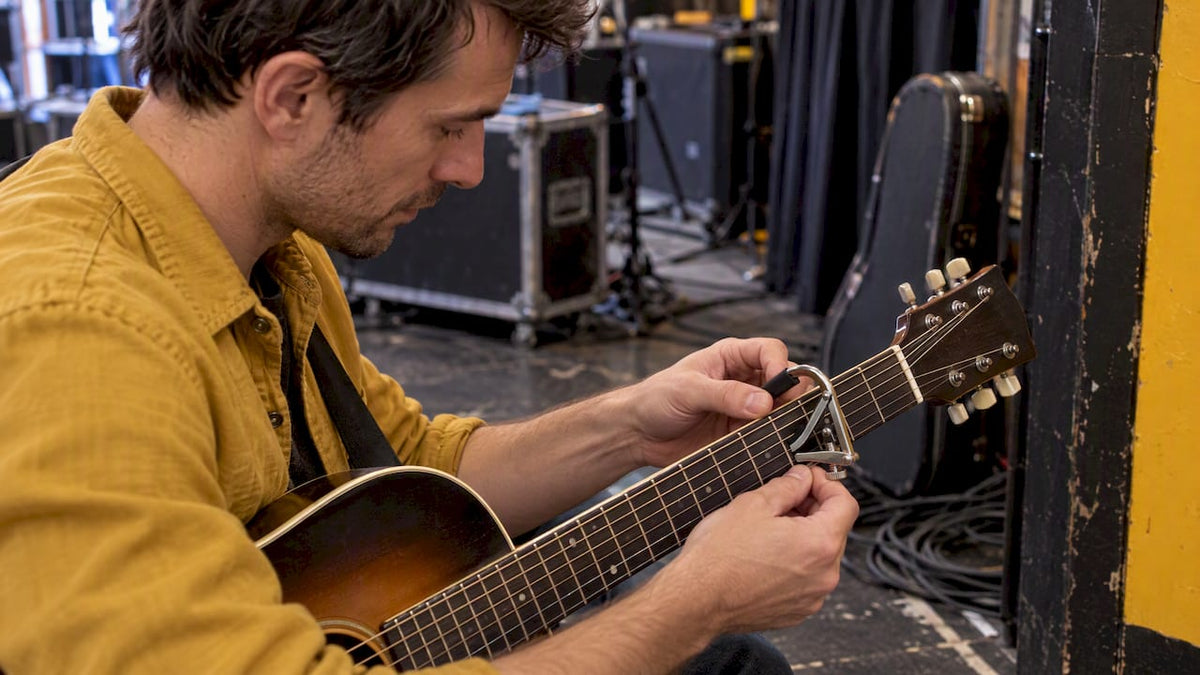
A capo is a clamp that holds all the strings down across one fret, so every open string sounds higher and you can play the same chord shapes in a different key. To use one: pick your fret, clamp the capo just behind that fret wire with the bar parallel to it, use the lightest pressure that lets every string ring clean, then check your tuning. That is the whole method. The rest of this guide covers the details that make it work properly: placement, fret choice, chord changes, tuning, and the capo type that suits your guitar.
Table of Contents
- What a capo actually does
- How to put a capo on, step by step
- Choosing your fret and working out the key
- Using a capo for your voice
- Which capo suits your guitar
- Tuning after you fit the capo
- Mistakes to avoid
- Our view: a capo is a tool, not a crutch
- Get a capo that fits and a guitar that plays well with it
- Other gear that goes with a capo
- FAQ
- Sources
What a capo actually does
A capo works as a movable nut. It shortens the length of string that can vibrate, which raises the pitch without changing the shapes your fingers make. The Yamaha guitar hub explains that moving the capo up one fret raises the pitch by one semitone, and two frets raises it by a whole step.
In practice that means a capo at the 2nd fret lets you play an open G shape and hear A. You keep the easy open shapes you already know, but the song sits in a new key.
People reach for a capo for three main reasons:
- To avoid barre chords. A song in F# minor is hard for a beginner. With a capo at the 2nd fret, the same song uses Em shapes.
- To fit a singer’s voice. You move the whole song up or down to a key that suits the voice.
- To change the sound. Open strings higher up the neck ring with a brighter, chimey tone that you can’t get any other way.
How to put a capo on, step by step
These steps suit a standard trigger, clamp or spring capo on a steel-string acoustic or electric guitar.
- Decide the fret. The song’s tab or chord chart usually says it, for example “Capo 3”. If you are choosing it yourself, see the sections on keys and voices below.
- Open the capo and hold the guitar steady. Keep the guitar upright or resting on your leg, with the neck in your fretting hand’s reach.
- Place the capo just behind the fret wire. “Behind” means on the side nearer the tuners. Imagine you want the 3rd fret: the capo sits in the gap between the 2nd and 3rd fret wires, tucked right against the 3rd. Not on top of the wire, and not in the middle of the gap.
- Keep the bar parallel to the fret. If it is slanted, one side of the strings gets pinched harder than the other and some notes buzz or go sharp.
- Release the trigger or clamp gently. Let it close onto the neck rather than snapping it shut.
- Pick each string one at a time. Listen for any buzzing or dead notes. If one rings flat or rattles, shift the capo a millimetre closer to the fret wire before you add any pressure.
- Check the tuning. More on that below.
For a short set of practice routines for fitting and removing a capo smoothly, see our guide to putting a capo on a guitar, which includes three beginner drills for clean changes.
Why placement matters more than pressure
The most common beginner mistake is squeezing harder when a string buzzes. A capo that sits in the middle of the fret space needs far more force to make the strings contact the fret cleanly, and that force pulls the strings sharp. Close to the wire, the strings are pinned with less pressure, so you get a cleaner note and steadier tuning. Move the capo before you tighten it.
If your capo has an adjustable screw or tension knob, set it so the clamp holds the strings down and no more. When you can pick all six strings and each one sounds clear, stop tightening.
Choosing your fret and working out the key
Every fret you move the capo up raises the key by one semitone. Here is how the five most common open shapes change as you move the capo up:
| Shape you play | Capo 2 | Capo 3 | Capo 4 | Capo 5 |
|---|---|---|---|---|
| C | D | E♭ | E | F |
| G | A | B♭ | B | C |
| D | E | F | F# | G |
| A | B | C | C# | D |
| E | F# | G | G# | A |
Read it like this: if you finger a G chord with the capo on the 2nd fret, the chord you hear is A.
A worked example
Say a song is written in A with the chords A, D and E. The shapes are fine, but if the song also has an F#m you will need a barre. Instead, put the capo on the 2nd fret and play G, C and D shapes (and Em for the minor chord). What you hear is A, D and E, and the Em shape sounds as F#m. You have swapped one barre chord for an open shape, and the song is still in its original key.
The quick rule: take the chord you want to hear, count down the number of semitones equal to the capo fret, and play that shape. To hear A with a capo at 2, play the shape two semitones lower, which is G.
What fret do I put my capo on?
It depends on what you are trying to do:
- Following a song’s tab or chart: use the fret it states.
- Avoiding barre chords: work out which open shapes (usually G, C, D, Em, Am, A, E) give you the chords you need, then use the table above to find the fret.
- Matching a singer: try the song in a few keys and choose the one where the singer is comfortable at the top and bottom of their range. Then find the open shapes and capo fret that produce it.
A useful example is a singer who wants a song in F. Play D, G, A and Bm shapes with the capo on the 3rd fret, and you hear F, B♭, C and Dm. All of these are easy open or near-open shapes.
What key is a capo on the 2nd fret?
It raises whatever key you play in by a whole step, two semitones. Open C shapes sound as D, G shapes as A, D shapes as E, and E shapes as F#. If you play in G with the capo on the 2nd, you are in the key of A.

Using a capo for your voice
Capos are a practical tool for singers. Experienced players often use them to shift a song into a range that suits the vocalist, particularly in long sets or early performances when the voice is not fully warmed up. A capo lets you do that while keeping chord shapes simple.
Here is a straightforward way to find your key:
- Play the song with no capo and sing it through.
- If the high notes strain, you need a lower key. A capo can only raise pitch, so find a lower key first by transposing the chords down, then use the capo to get the shapes you like.
- If the low notes disappear, move the capo up one fret at a time until the line sits comfortably.
- Write the final capo fret and chord shapes on your chart so you do not have to work it out again.
Keep your first attempts to songs with three or four chords. Once the logic is clear, longer songs follow the same pattern.
Which capo suits your guitar
Not every capo fits every neck. The key factor is the curve of the fretboard. According to Andy Guitar’s capo lesson, steel-string acoustic and electric guitars generally have curved fretboards and need a capo with a matching curve, while classical guitars have flatter, wider necks and need a capo designed for that shape. A mismatched capo gives you buzzing on the outer strings, because the middle strings take most of the pressure, or uneven clamping on a flat neck.

The same source notes that entry-level players can get excellent results from a simple trigger-style capo, while pricier designs offer more reliable tension control for gigging.
Here is how that maps to the capos we stock:
| Your guitar | Capo type to look for | Where to start |
|---|---|---|
| Steel-string acoustic | Curved capo for acoustic and electric | Mojo MCP-7 acoustic-electric capo |
| Electric guitar | Curved capo | Shubb electric capo C4 |
| Classical or nylon-string | Flat capo | Shubb classical capo C2 |
| Acoustic, for open-string effects | Partial capo | Kyser partial capo |
A partial capo covers only some of the strings, so the others stay open. It is a way to get open-string voicings and altered tunings without retuning, and it is worth trying once you are comfortable with a standard capo.
Tuning after you fit the capo
Always retune with the capo on. Even with good placement, clamping tends to pull the strings slightly sharp. Use a clip-on or pedal tuner rather than your ear, adjust each string a touch, and then play a chord to confirm.
Two habits help:
- Tune the guitar first, then fit the capo, then check each string. If the capo pulls all the strings sharp by a similar amount, your placement and pressure are likely fine and you only need a small correction.
- If tuning drifts every time you move the capo, look at placement first, pressure second. A capo that is slightly slanted is a common cause.
On a new set of strings, expect them to keep stretching for the first days, so tuning will wander with or without a capo. If a guitar will not stay in tune with a capo whatever you do, the nut, bridge or string gauge may be the issue. That is a job for a proper setup, and our acoustic guitar setup guide explains what a setup covers.
Mistakes to avoid
- Clamping on top of the fret wire. The strings can’t contact the fret properly and the note sounds dead or flat.
- Clamping in the middle of the fret space. It needs more pressure and usually buzzes anyway.
- Over-tightening. Extra force makes the strings go sharp and, over time, is hard on the guitar.
- Leaving the capo on after practice. Yamaha’s accessory guide advises removing it when you are done, because a clamped capo keeps constant pressure on the frets and strings.
- Using the wrong curve. A flat capo on a curved neck buzzes. Check the type before you buy.
- Forgetting where the capo is. When you change songs mid-session, mark the fret on your chart so you do not play the right shapes in the wrong key.
Our view: a capo is a tool, not a crutch
We handle a lot of guitars at Musicstreet, and a capo comes up in almost every conversation with a beginner. Many worry that using one is cheating. We do not think so. Players like Robbie Calvo, writing on the Yamaha hub, describe the capo as a creative tool rather than a crutch, one that opens up shimmery voicings higher up the neck. We agree.
Our practical advice:
- Buy the right shape for your guitar first. A capo that matches the neck will improve your playing faster than an expensive one that does not.
- Learn two or three capo positions well rather than all twelve at once. 2nd, 3rd and 5th cover a surprising amount of songs.
- Treat buzzing as a clue. If a capo buzzes even when placed right and gently applied, there may be something to look at on the guitar itself, such as fret wear or string height. That is what our setup and inspection work is for. Every instrument we sell is set up and inspected, and we are happy to look at one you already own.
- Try before you commit. If you are choosing a new guitar and want to hear how it sounds with a capo on higher frets, come into the shop in Huntingdon and try it. Some guitars ring beautifully at the 5th fret and others sound thinner. You learn that in your hands, not from a spec sheet.
— Music
Get a capo that fits and a guitar that plays well with it
If you are ready to buy, our capos for acoustic and electric, electric and classical guitars are all on the site, and you can browse the rest of our guitar accessories for tuners, straps and cases to go with them. If your guitar buzzes or will not hold its tune, ask us about a setup or repair through Musicstreet. We also offer free UK delivery on orders above a minimum amount, and an in-store restring service if your strings are due a change.

Other gear that goes with a capo
A capo is rarely the only thing you will want within reach. A clip-on tuner is the obvious partner, since you will be checking pitch every time the capo moves. Spare strings matter if you capo high on the neck regularly, because the area around the capo sees extra wear. Our guitar accessories guide covers the essentials for every player.
If you enjoy changing the sound of your guitar, you can combine a capo with other approaches. Our guides to open tuning and tuning to Open G show how to get different voicings, and a capo works well with both. Be careful when retuning strings, and have a professional help if you are unsure how much tension the neck can take.
For more on why the capo is a useful transposing tool, Acoustic Guitar magazine’s lesson walks through playing in all twelve keys with one.
FAQ
How do I use a guitar capo as a beginner?
Choose the fret your song asks for, clamp the capo just behind that fret wire with the bar parallel to it, and use only enough pressure for every string to ring clearly. Then play the open chord shapes as normal, because the capo changes the key and not the shapes. Tune up with a tuner once it is on.
What fret do I put my capo on?
Use the fret shown in the song’s tab or chord chart. If there is none, pick the fret that lets you play easy open shapes in the key you want, or the one that suits your singing range. Each fret up is one semitone higher.
What key is a capo on the 2nd fret?
It raises your key by a whole step. Playing in G with a capo at the 2nd fret sounds in A, C shapes sound as D, and D shapes sound as E.
Can I use the same capo on acoustic, electric and classical guitars?
Only if the fretboard curves are similar. Classical guitars have flatter, wider necks and work best with a flat capo, while steel-string acoustics and electrics have curved boards and need a matching curve. A capo that does not match usually causes buzzing or uneven clamping.
Should I leave my capo on the guitar?
No. Take it off after you finish playing, because leaving it clamped keeps constant pressure on the strings and frets.
Sources
- The Art of Using a Capo, Yamaha Music
- How to Play Guitar and Sing at the Same Time, Yamaha Music
- How To Use A ‘Capo’, Andy Guitar
- Choosing an Acoustic Guitar: Must-have accessories, Yamaha Musical Instrument Guide
- Video Lesson: How to Use a Capo to Play Music in All 12 Keys, Acoustic Guitar



Share:
Humbucker vs P-90 Pickups for Jazz Tone