


Start by learning three things on the page: the clef, the key signature, and the time signature. Once you know those, map the stave to your guitar’s open strings and pick a small four-fret zone to play in. Standard notation tells you pitch and rhythm; tablature tells you where to put your fingers. Practise slowly with a metronome, and check the setup on your own guitar at Musicstreet if fret buzz or intonation is slowing you down.
Table of Contents
- Understanding guitar sheet music vs tablature
- What do the notes on the stave actually mean?
- How rhythm and timing work on the page
- Why does one note appear in five places on the fretboard?
- Reading chord symbols: what does 7 actually mean?
- Building sight-reading skill: exercises and a practice plan
- Why trust this guide on reading guitar sheet music?
- Reading rhythmic notation for guitar-specific techniques
- Understanding bends, slides, hammer-ons, pull-offs, and vibrato
- Reading dynamics and articulation in guitar sheet music
- From reading notes to playing with real expression
- Common challenges beginners face, and how to get past them
- Our take: teach rhythm before pitch, and pitch before position
- Starter guitars and gear to support your practice
- Sources
- FAQ
Understanding guitar sheet music vs tablature
Standard notation and tablature answer different questions, and mixing them up is where most beginners get stuck. Notation shows pitch, note duration, dynamics, and phrasing on a five-line stave, exactly the way a violinist or pianist reads their part, as detailed in the Indian Music Notation System Explained For Musicians. TAB shows none of that. It uses six horizontal lines representing your six strings, with numbers marking which fret to press, but it says nothing reliable about rhythm unless stem marks are added above it.
That difference matters the moment you play with anyone else. A drummer or singer reading a chart needs you locked to the same rhythmic grid, and TAB alone rarely gives you that. Standard notation does. Here’s the practical split:
- Standard notation is best for ensemble playing, reading unfamiliar rhythms accurately, and communicating with musicians who don’t play guitar.
- Tablature is best for fast technique-learning, picking up riffs by ear-adjacent means, and mapping fingerings quickly.
- Combined notation and TAB (rhythm stems above, fret numbers below) gives you the best of both, which is why most published guitar method books use it.
A useful guide to reading guitar tabs shows how the two systems sit on the page together, and it’s worth studying once you’ve got the stave basics down. Modern sheet music for guitar leans on this hybrid format precisely because TAB alone leaves rhythm ambiguous, while notation alone leaves fretboard choices open.
What do the notes on the stave actually mean?
Guitar music sits in the treble clef, but with a quirk that trips up almost every beginner: it’s written an octave higher than it actually sounds. That’s a convention, not an error, and it exists so the notes don’t need endless ledger lines below the stave to represent the guitar’s naturally low range. Yamaha’s guide to guitar notation confirms this octave transposition as standard across published guitar sheet music.
The five lines of the treble clef, bottom to top, are E, G, B, D, F. Most players remember them with “Every Good Boy Deserves Football.” The four spaces spell F, A, C, E, which needs no mnemonic at all, you just read the word.
Ledger lines extend the stave for notes above or below it, and these show up constantly on guitar because of that low open sixth string sitting two ledger lines under the bottom line.
Here’s how to anchor your six open strings on the stave straight away:
- Low E (6th string) sits two ledger lines below the stave.
- A (5th string) sits on the first ledger line below the stave.
- D (4th string) sits just below the bottom line, in the small gap.
- G (3rd string) sits on the second line from the bottom.
- B (2nd string) sits on the middle line.
- High E (1st string) sits on the top space.
Pro Tip: Make six flashcards, one per open string, and drill them out of order for two minutes a day. Speed comes from repetition, not from staring harder at a single note.
How rhythm and timing work on the page
Pitch tells you what to play; rhythm tells you when. Get the rhythm wrong and even the right notes sound broken, so this is the layer worth mastering before you worry too much about pitch accuracy.
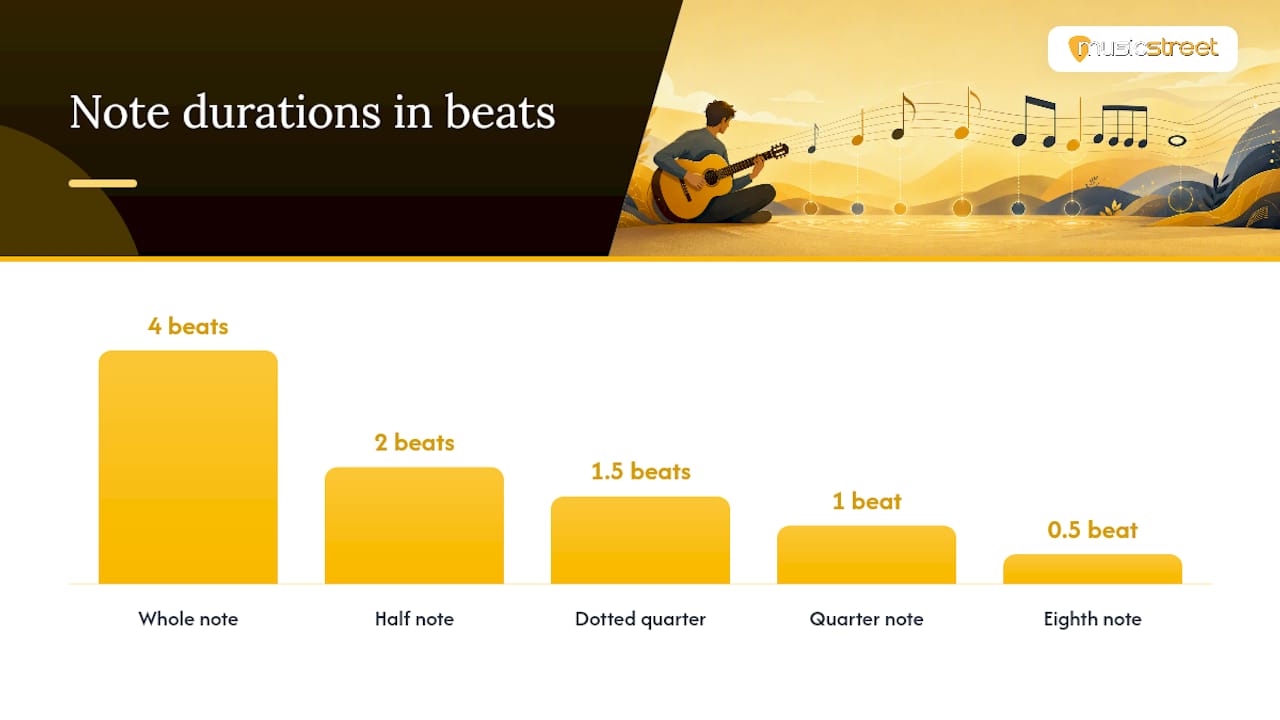
A whole note lasts four beats, a half note two, a quarter note one, an eighth note half a beat, and a sixteenth note a quarter of a beat. Rests use the same duration system but mark silence instead of sound. A dotted note adds half its own value again, so a dotted quarter note lasts one and a half beats. Ties join two notes of the same pitch into one continuous sound across a bar line or beat division, and beams group eighth and sixteenth notes visually so you can see the pulse at a glance.
Time signatures tell you how beats are grouped. A piece marked 4/4 has four quarter-note beats per bar, the most common signature in guitar music by a wide margin. 3/4 gives you three beats per bar, the waltz feel. 6/8 groups beats in twos of three, giving a rolling, compound feel very different from 3/4 despite the similar numbers.
The most reliable rhythm workflow: clap the rhythm on its own first, counting out loud, then play it on a single muted string, then finally add real pitches once the timing feels automatic.
- Clap and count before you touch the fretboard.
- Set the metronome slower than feels necessary and only speed up once it’s clean.
- Play the passage five times in a row without a single rhythmic slip before moving on.
Short daily rhythm drills beat occasional long sessions. A structured progression of roughly 15 minutes of daily practice over 8 to 12 weeks is enough to get most beginners reading simple melodies with confidence, far more effective than a single two-hour cram session once a week.
Why does one note appear in five places on the fretboard?
Pianists have one key per pitch. Guitarists have up to five or six, because most notes exist on multiple strings at different frets. That’s not a flaw in the instrument, but it does mean you need a strategy, or you’ll freeze mid-phrase trying to decide where to put your finger.
The fix is called position lock: pick a four-fret window before you start playing, and commit to it for the whole phrase rather than jumping around hunting for the “best” fret each time. Guitarists who separate the decision-making from the playing read faster and make fewer mistakes, because the brain isn’t recalculating fretboard geography note by note.
Here’s the three-step workflow to use every time you sight-read a new line:
- Scan the next four to eight notes before playing a single one, and spot the highest and lowest pitches in that stretch.
- Choose a position (a four-fret zone) that lets you reach every note in that stretch without shifting your hand.
- Play through the phrase committed to that position, using open strings only where the notation or your chosen fingering calls for them.
Sheet music sometimes marks position with Roman numerals (V means fifth position, meaning your first finger sits at the fifth fret) alongside finger numbers 1 to 4 for index through little finger. Shift position only when the melody genuinely runs outside your four-fret window, not out of habit.
Pro Tip: When a passage seems impossible, the position is usually wrong, not your technique. Rescan for a window that puts more of the phrase within comfortable reach.
Reading chord symbols: what does 7 actually mean?
Lead sheets and gig charts skip full notation for chords and use shorthand instead: a letter for the root, plus a modifier for the quality. A bare letter like C means C major. Add a lowercase “m” and Cm means C minor. These two conventions cover a huge share of what you’ll see on a typical chart.
The modifier that trips up almost every beginner is the number 7. A plain “C7” means a dominant seventh, built from the major triad plus a flattened seventh note, and it has a bluesy, unresolved pull. “Cmaj7,” by contrast, keeps the seventh note unflattened, giving a smoother, jazzier sound entirely. Confusing the two changes the chord’s quality substantially, not just its flavour, so treat “7” and “maj7” as different chords, never interchangeable shorthand for “add a seventh.”
Other common modifiers:
- sus4 replaces the third with a fourth, creating tension that wants to resolve.
- add9 stacks a ninth on top of a triad without adding the seventh.
- dim or ° signals a diminished chord, built entirely from minor thirds.
Keep a chord-symbol crib sheet in your case for the first few months. Nobody memorises all of these in one sitting.
Building sight-reading skill: exercises and a practice plan
Reading fluently comes from short, focused repetition, not marathon sessions. These four micro-exercises target the specific skills covered above:
- Open-string flashcard drill: two minutes daily, naming each open string’s position on the stave from memory.
- Single-string melodies: play simple tunes using only one string to isolate pitch-reading from fretboard-hunting.
- Rhythm-clap-then-play: clap every new rhythm before you play it, every time, no exceptions.
- Slow position-lock drill: pick any four-fret zone and sight-read unfamiliar simple melodies within it only.
Here’s a four-week starter plan built around those exercises:
- Week 1 (10 minutes daily): open-string flashcards plus clapping rhythms from a beginner method book.
- Week 2 (15 minutes daily): single-string melodies in first position, metronome at a deliberately slow tempo.
- Week 3 (15 minutes daily): introduce a second string, start combining rhythm and pitch on short four-bar phrases.
- Week 4 (20 minutes daily): sight-read a full simple melody (a nursery rhyme or carol works well) start to finish, allowing mistakes.
For weeks 5 to 12, extend into full first-position pieces, then gradually widen your position-lock zones. A 4-week starter plan moving from open-string anchors to first-position melodies to combined rhythm and pitch produces reliable early gains, and starting with familiar tunes rather than unfamiliar ones speeds recognition further, since your ear already knows where the melody should go.
Milestones worth aiming for: reading a simple lead sheet by week 6, and playing a short classical guitar phrase cleanly by week 10. Apps like Note Rush and method books such as the Mel Bay series pair well with hands-on practice, and MusicStreet’s easy songs for beginners list gives you real repertoire to apply the plan against.
Why trust this guide on reading guitar sheet music?
This guide comes from Musicstreet, a guitar retailer based in Huntingdon, Cambridgeshire, that sells new and pre-owned electric, acoustic, and bass guitars alongside expert setup and repair work. Teaching people to read music properly is part of the same job as fitting the right strings or adjusting an action, both are about removing friction between a player and their instrument.
If a guitar’s intonation is off or the action sits too high, sight-reading becomes far harder than it needs to be, since bends and position shifts fight you at every turn. Musicstreet’s in-store setup service and guitar tryouts exist to fix exactly that before it slows your reading practice down. For further reading, the bass guitar tab guide and beginner TAB guide cover adjacent notation systems worth knowing.
Reading rhythmic notation for guitar-specific techniques
Standard rhythm notation covers note values and rests, but guitar parts often layer technique markings directly onto that rhythm, and these change how a note sounds without changing its pitch or duration on paper.
Palm muting is usually marked with “P.M.” written above the stave, sometimes with a dashed line showing how long to hold the mute. You rest the edge of your picking hand lightly against the strings near the bridge, producing a dampened, percussive tone rather than a ringing one. The rhythm underneath stays exactly as written, only the tone changes.
Ghost notes appear as small notes in parentheses, or sometimes as an “x” symbol instead of a normal notehead on the stave or in TAB. They represent a muted, rhythmic thump rather than a clear pitch, common in funk and rock rhythm parts where the percussive feel matters more than the note itself.

Staccato dots above or below a notehead shorten the note, cutting it off well before its full written value. Accent marks, a small “>” symbol, tell you to hit that note noticeably harder than its neighbours. Both appear constantly in rhythm guitar parts where groove depends on which notes push forward and which sit back.
Read these markings the same way you’d read a dynamic marking: as an instruction layered on top of the pitch and rhythm you’ve already worked out, not as a separate thing to decode from scratch.
Understanding bends, slides, hammer-ons, pull-offs, and vibrato
Guitar notation carries a set of symbols that don’t exist in piano or violin scores, because they describe things only a fretted string instrument can do.
A bend is shown with a curved arrow pointing upward from the notehead, often labelled with a fraction like ½ or full, telling you how far to bend the string in pitch. You fret the note, then push or pull the string across the fretboard to raise its pitch smoothly into the target note.
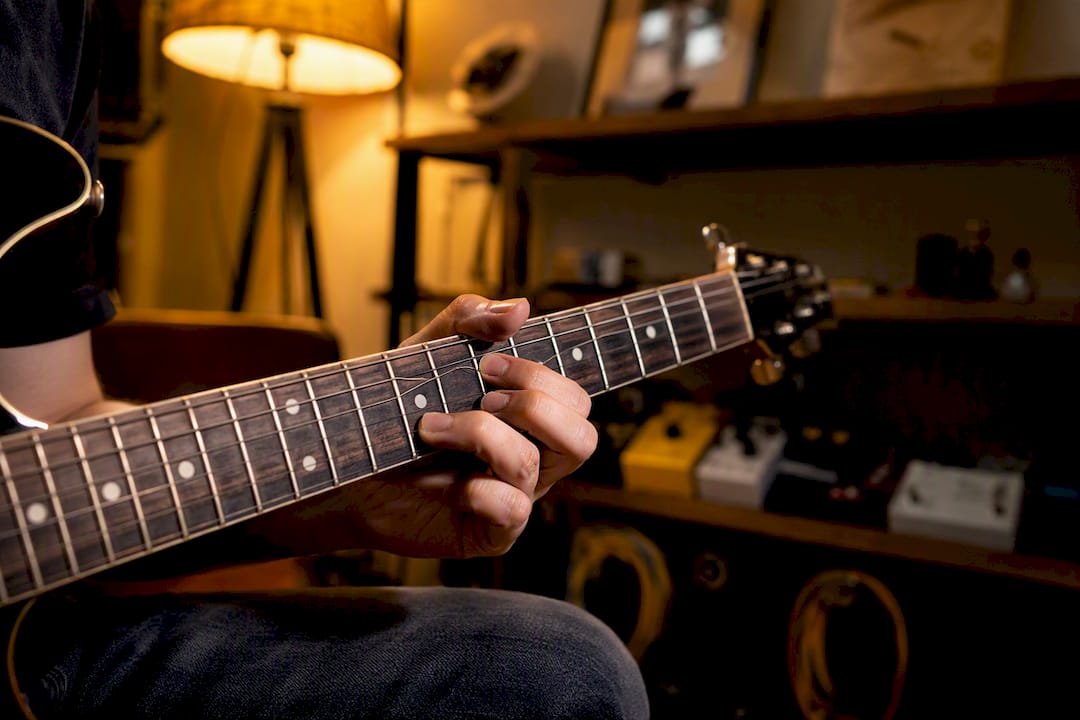
A slide appears as a diagonal line connecting two noteheads, sometimes with “sl.” written above it. You fret the first note, then slide your finger along the string to the second fret without lifting off, keeping continuous pressure the whole way.
Hammer-ons and pull-offs are shown with a curved slur line connecting two notes, usually labelled “H” or “P.” A hammer-on means you pick the first note, then bring a second finger down onto a higher fret without picking again. A pull-off is the reverse: you pick a fretted note, then release that finger to sound a lower note or open string, again without a second pick stroke.
Vibrato looks like a wavy horizontal line above the note, telling you to oscillate the pitch slightly and repeatedly, usually by rocking the fretting finger back and forth. It adds sustain and expression to a held note rather than changing its written pitch or duration.
All five symbols sit above or below the stave and TAB simultaneously in most published guitar music, so you’re reading pitch, rhythm, and technique together once you’re comfortable with the basics.
Reading dynamics and articulation in guitar sheet music
Dynamics tell you how loud or soft to play, and they use the same Italian abbreviations found across all instrumental notation. p (piano) means soft, f (forte) means loud, mp and mf sit in between, and a wedge shape opening left to right (a crescendo) means gradually get louder, while the reverse wedge (decrescendo) means gradually get softer.
Articulation markings shape how each individual note is attacked and released, layered on top of dynamics rather than replacing them. A staccato dot shortens a note. A legato slur, a curved line connecting several different notes, tells you to play them smoothly connected, ideally without picking every single one, using hammer-ons and pull-offs where the fingering allows.
An accent mark makes a single note stand out from its neighbours, useful for driving a rhythm guitar part or emphasising a melody note within a busier texture. A fermata, a small curved line with a dot underneath sitting over a note, tells you to hold that note longer than its written value, at the performer’s discretion, common at the end of a phrase or piece.
None of these markings change what fret you play. They change how you play it, and skipping them is the single fastest way to make a technically correct performance sound flat and mechanical. A phrase read with accurate pitch and rhythm but no dynamics still sounds like a robot working through a checklist. Read the dynamic markings with the same seriousness as the notes themselves, right from your very first pieces, and expression becomes a habit rather than an afterthought you bolt on later.
From reading notes to playing with real expression
Getting individual notes and rhythms right is the foundation, but a piece only comes alive once you stop treating each note as a separate decision and start reading in phrases instead.
Look ahead as you play, not just at the note under your finger. Sight-readers who read four to eight notes ahead of where they’re actually playing build a mental buffer that lets them shape phrasing and dynamics in real time, rather than reacting to each note as it arrives. This takes deliberate practice, since the instinct when learning is to stare at exactly what you’re playing right now.
Play through mistakes rather than stopping. A wrong note in the middle of a phrase matters far less than breaking the rhythm to fix it, since a broken pulse ruins the musical line more than one bad pitch ever will. Treat mistakes as background noise the first few times through a new piece, and only isolate and drill them once you’ve got the overall shape down.
Breathe phrases the way a singer would. Guitar notation rarely marks phrase breaks explicitly, but most melodies naturally group into two or four-bar units, and finding those units yourself, then shaping a slight lift or pause at their edges, turns a mechanical run of notes into something that sounds intentional. Listen to a recorded version of any piece you’re learning before you sight-read it. Hearing where a skilled player breathes, accents, and shapes dynamics gives you a target to aim for that the page alone can’t fully convey.
Common challenges beginners face, and how to get past them
Almost every beginner hits the same handful of walls, and knowing they’re normal makes them far easier to push through.
Reading too slowly to keep pace with the beat is the most common complaint, and it’s usually a symptom of trying to read pitch and rhythm simultaneously before either is automatic. Go back to clapping rhythms alone, and drilling pitch recognition alone, before combining the two again.
Losing your place on the stave happens constantly with ledger lines, since notes above and below the stave require counting lines rather than instant recognition the way notes on the stave itself do. Flashcard drills targeting specifically ledger-line notes fix this faster than general reading practice.
Freezing when a note appears in an unfamiliar fretboard spot is a position-lock failure, not a reading failure. If you’ve scanned the phrase and locked a position properly, every note should have one obvious answer rather than five competing options.
Losing the pulse when technique markings appear (bends, slides, ghost notes) is common because beginners treat the technique as a separate task from keeping time. Practise the plain rhythm first, without the technique, then reintroduce the bend or slide once the pulse is solid.
Getting overwhelmed by everything at once on a full page of notation with chords, dynamics, and technique markings layered together is normal even for competent readers tackling new repertoire. Strip a new piece back to rhythm only, then pitch only, then combine, exactly as recommended earlier in this guide, rather than trying to read every layer simultaneously from the first attempt.
Our take: teach rhythm before pitch, and pitch before position
Most beginner guitar material gets the teaching order backwards. It throws pitch recognition at students first, on the theory that finding notes on the stave feels like the “real” skill, and treats rhythm as something you’ll pick up by osmosis. That’s the wrong sequence, and it’s why so many players can name a note instantly but still can’t play a simple melody in time.
Rhythm should come first, because a rhythmically solid wrong note is far more musical, and far more fixable, than a rhythmically shaky right one. Pitch anchors come second, built from the six open strings outward. Position lock comes last, once the first two are automatic, because trying to solve fretboard geography while you’re still counting beats in your head is asking too much of working memory at once.
The conventional advice to “just practise more” also undersells how much a badly set up instrument can sabotage a beginner’s progress. High action and poor intonation make bends, slides, and clean fretting genuinely harder, no amount of practice discipline fixes a guitar that’s fighting you. Get the instrument right first, then apply the method.
— Music
Starter guitars and gear to support your practice
Reading music is only half the job. Playing it back on an instrument that responds well makes every exercise in this guide easier to feel and hear, which is exactly why the guitar you learn on matters as much as the method itself.
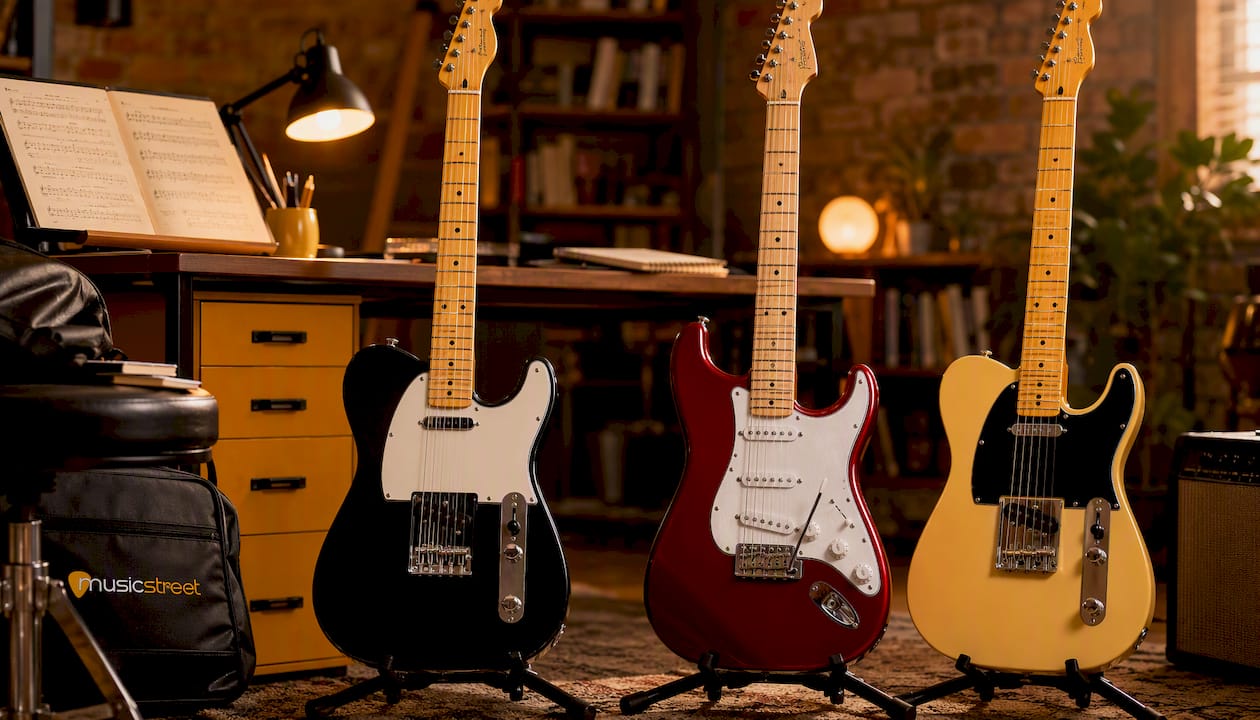
The Fender Standard Telecaster Maple Neck Electric Guitar Black suits beginners moving past their first cheap starter pack, thanks to a slim, comfortable neck profile and a bright, clear tone that makes single-string melody exercises easy to hear clearly. For players who want a slightly rounder sound and a contoured body, the Fender Standard Stratocaster Maple Neck Electric Guitar Candy offers a versatile three-pickup setup that handles everything from clean sight-reading practice to more expressive bends and vibrato once you’re ready. Once you’ve outgrown a genuine entry-level instrument, the Fender American Special Telecaster Vintage Blonde is a proper step-up, built with the setup precision that makes fast position shifts and clean articulation noticeably easier.
Round out your practice setup with a music stand for keeping sheet music at eye level, a dedicated metronome, a beginner method book for structured repertoire, and a spare set of strings, since broken strings mid-practice kill momentum fast. Try any of these guitars in-store at Musicstreet’s Huntingdon shop, where our team can check the setup and action before you buy, or browse the full range online and get in touch about a fitting.
Sources
- How to Read Acoustic Guitar Sheet Music (2026 Beginner’s Guide) | Strum Avenue
- A Guitarist’s Guide to Reading Sheet Music and Tablature - Yamaha Music
- Lead-sheet symbols / chord notation reference - University of Puget Sound
FAQ
Is it hard to read guitar sheet music?
It’s genuinely harder than reading TAB, mainly because guitarists have to solve a fretboard-position puzzle that pianists don’t face, but a structured 8 to 12-week practice routine gets most beginners reading simple melodies confidently.
What is the easiest way to read sheet music?
Separate the two skills: clap and count the rhythm first, then find the pitches on the fretboard afterwards, and only combine them once each is automatic on its own.
What does a 7 mean on a guitar music sheet?
A plain “7” after a chord letter, like C7, means a dominant seventh chord with a flattened seventh note, which sounds distinctly different from “maj7,” so never treat the two as interchangeable.
What is the 80/20 rule for guitar practice?
There’s no single agreed definition of an “80/20 rule” specific to guitar practice, but the closest useful version is spending roughly 80% of your time on focused, slow, deliberate repetition of material just beyond your comfort zone, and the remaining 20% on faster run-throughs of things you already play well.





Share:
How to tune your guitar: a step-by-step routine that sticks
Loop pedals for beginners: 5 steps to start tonight, where to try