Are you looking to take your guitar playing to the next level by crafting your own unique sound? A well-organized pedalboard is essential for any guitarist who wants to explore new tones, textures, and effects.
In this blog, we’ll guide you through the basics of pedalboards and show you how to build your own custom system, whether you’re a beginner just starting with a few essential pedals or an experienced player looking to expand your setup. You’ll learn about different types of pedalboards, how to choose and arrange your pedals, and tips for maintaining a clean, efficient system that’s ready for any performance. Get ready to unleash your creativity and transform your sound!
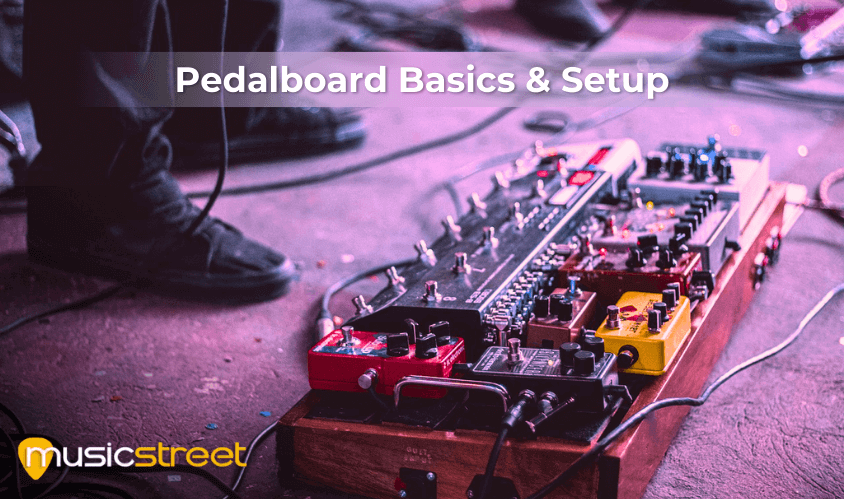
A pedalboard is a collection of connected effects pedals. Pedals typically used include distortion, wah, delay, reverb, and overdrive. Effects pedals allow the guitarist to modify their sound and create new tones, textures, and dynamics. Pedalboards are the perfect way to organise the pedals and ensure they are connected and powered correctly. However, building a pedalboard system is a complex task and requires guitar wiring and electronics knowledge. Few people know how this works, so we will discuss the details in this article.
A Brief History of Guitar Effects
Guitar effects have been around since the early days of the electric guitar. Distortion was first created by pushing the volume on the amplifier beyond its limits, and it quickly became a famous sound because early guitar amplifiers were low-fidelity, allowing for more creative manipulation. Around the mid-40s, musicians such as Elmore James and Buddy Guy attempted to replicate the raw sound of early blues musicians, particularly Muddy Waters and Charles Burnett, more famously known as Howlin' Wolf. Things changed in 1955 when Chuck Berry released his hit song "Maybellene" and popularised the use of guitar effects. He used a combination of distortion, echo, and reverb to create a unique sound that would soon become the standard for rock and roll guitarists.
During the British Invasion, The Kinks' Dave Davies used a razor blade to slash the speaker cones of his amplifier, which laid the foundation for the band's hit song "You Really Got Me." Around that same period, Keith Richards of the Rolling Stones used a Maestro FZ-1 Fuzz-Tone to record the band's hit "(I Can't Get No) Satisfaction."
Things elevated further around the 1970s when hard rock bands such as Led Zeppelin, Deep Purple, and Black Sabbath used guitar effects to create a unique sound, which laid the foundations for heavy metal as we know it today. Since then, more and more effects have been developed, from wah-wah pedals to octave dividers. Guitarists have all used them to create an even wider range of sounds. Today, effects are an integral part of the guitar sound and can be heard in almost every genre of music.
Building Your Own Pedalboard
Creating a pedal board is an excellent way to customise your sound and allow you to create a wide variety of tones. However, not all effects pedals are the same, so you must consider various factors when making a pedalboard, depending on its size.
Small Pedalboards
If you are limited in space, a small pedalboard is ideal. This type of pedalboard typically consists of a few essential effects, such as distortion, delay, and reverb. This setup is perfect for those who are just starting but want to experiment with different sounds.
Medium Pedalboards
A medium pedalboard grants you more room to add additional effects to your setup. This size is perfect for those still experimenting with their sound but wanting more control over it. You can add more complex effects, such as modulation and pitch-shifting, and additional effects, such as compressors, EQs, and filters.
Large Pedalboards
A large pedalboard gives you complete control and flexibility over your sound. You can add any type of effect you desire and create complex and dynamic sounds. This type of setup is perfect for experienced guitarists who want to have ultimate control over their sound.
Adding Accessories
Pedalboards are also excellent for adding accessories such as power supplies, patch cables, and other items you deem essential, such as controller. When building your pedalboard, you must carefully plan and leave enough room for these accessories. This will help keep your setup organised and efficient.
Choosing the Right Pedals for Your Pedalboard
Selecting the right pedals is crucial for building a pedalboard that enhances your unique sound. Understanding what each type of pedal does will help you make informed decisions and create a board that suits your musical style and needs.
Essential Pedals for Beginners
If you are new to using pedals, start with a few essential effects to shape your core sound:
- Tuner Pedal: A must-have for keeping your guitar in tune during performances or practice sessions.
- Overdrive/Distortion Pedal: Adds grit and character to your tone, essential for rock, blues, and metal genres.
- Reverb Pedal: Creates a sense of space and depth, making your playing sound more dynamic and atmospheric.
- Delay Pedal: Adds repeating echoes to your sound, useful for creating rhythmic and ambient effects.
Expanding Your Pedalboard: Intermediate Additions
Once you are comfortable with the basics, consider adding pedals that offer more tonal control and creative possibilities:
- Chorus Pedal: Adds a shimmering, multi-layered effect to your sound, perfect for enhancing clean tones.
- Compressor Pedal: Evens out your volume levels, providing a smooth, consistent sound and increasing sustain.
- EQ Pedal: Allows precise control over different frequency ranges, enabling you to shape your tone to suit different playing environments.
Advanced Pedals for Ultimate Control
For more experienced players, advanced pedals can unlock new dimensions of sound and creativity:
- Looper Pedal: Records short phrases that you can play back on a loop, ideal for solo performances or practicing layered parts.
- Pitch Shifter/Harmonizer Pedal: Alters the pitch of your signal, allowing you to create harmonies or dive into experimental sounds.
- Multi-Effects Pedal: Combines multiple effects in a single unit, offering convenience and flexibility for players who want a wide range of sounds.
Planning the Layout of Your Pedalboard
Organising your pedals efficiently is key to building a pedalboard that is functional and easy to use.
Signal Chain Order: Maximising Your Tone
The order in which you place your pedals on your board - known as the "signal chain" - affects your overall sound. Here’s a common approach:
- Tuner: Placing the tuner first ensures it receives a clean signal.
- Dynamics (Compressor, EQ): These pedals control your signal’s volume and tone before it reaches other effects.
- Gain Staging (Overdrive, Distortion, Fuzz): Overdrive and distortion pedals are typically placed after dynamic pedals to shape the sound further.
- Modulation (Chorus, Phaser, Flanger): These effects modify the sound, adding depth and texture.
- Time-Based Effects (Delay, Reverb): Placed towards the end, these pedals create echoes and ambient sounds that benefit from all other effects being applied first.
Power Management: Ensuring Consistent Performance
Efficient power management is crucial for a reliable pedalboard. Consider these options:
- Isolated Power Supplies: Provide clean, noise-free power to each pedal, reducing hum and interference.
- Daisy Chains: More affordable but can introduce noise if not used properly. Best for small boards with low-power pedals.
- Battery Power: Suitable for a minimalist setup but less reliable for extended performances.
Mounting and Connecting Your Pedals
Properly mounting and connecting your pedals is important to ensure they remain secure and functional.
Securing Your Pedals
- Velcro Strips: The most common method, allowing for easy reconfiguration.
- Dual Lock Tape: Offers a stronger hold than regular Velcro, providing extra security for heavier pedals.
- Mounting Brackets: Provide a semi-permanent solution, ideal for professional touring musicians.
Using Patch Cables and Connectors
- Patch Cables: Use short, high-quality patch cables to connect pedals with minimal signal loss.
- Right-Angle Connectors: Save space on your board and reduce the risk of damage from accidental pulls.
Maintaining Your Pedalboard
Regular maintenance ensures that your pedalboard stays in top condition and functions smoothly.
Cleaning and Caring for Your Pedals
- Dust and Debris Removal: Regularly clean your pedals with a soft, dry cloth to prevent dust and grime buildup.
- Check Connections: Inspect cables and power supplies for wear and tear, replacing them as needed to prevent signal loss or failure.
Troubleshooting Common Issues
- Signal Loss: If your sound is weak or intermittent, check for loose cables or power connections. Ensure all pedals are receiving adequate power.
- Noise and Hum: If you experience noise or hum, try using an isolated power supply, rearranging the signal chain, or checking for ground loop issues.
Experimenting with Your Pedalboard
Building a pedalboard is an ongoing process of experimentation and adjustment. Don’t be afraid to try different pedal combinations or rearrange your signal chain to find the sound that works best for you.
Creating Unique Sounds
- Stacking Overdrives: Combine two overdrive pedals to create a thicker, more complex distortion.
- Parallel Effects Loops: Use a pedalboard switcher or looper to run effects in parallel, allowing for more creative layering.
Conclusion
Building your own pedalboard is more than just a practical way to manage your effects, it’s a journey into finding your unique musical voice. By understanding the basics, from selecting the right pedals to arranging them for optimal performance, you’ll be well-equipped to create a system that enhances your playing style and meets your needs.
Remember, there’s no one-size-fits-all approach to pedalboards; it’s all about experimentation and finding what works best for you. Dive in, get creative, and let your pedalboard become an extension of your musical expression!
At MusicStreet, we have everything you need to build the perfect pedalboard and elevate your guitar playing. From essential pedals to high-quality accessories, our expert team is here to help you find the right gear for your sound. Visit us today and start creating your ultimate setup with confidence!
If you are looking for a music shop in Cambridgeshire, Musicstreet is for you! We offer various selections from the best brands, such as Gretsch, Rickenbacker, and EVH, for affordable prices. Call us today at +4414 8043 1222 to place an order!
Frequently Asked Questions
How do I keep my pedalboard organized and easy to use?
To keep your pedalboard organized, start by arranging your pedals in the order they are used in the signal chain (like tuner first, reverb last). Use Velcro or dual lock tape to secure the pedals, and short patch cables to reduce clutter and avoid tangles.
What should I do if my pedals start making unwanted noise or humming?
If your pedals are creating noise or humming, check for loose cables or poor-quality connections. Ensure your power supply is isolated to avoid interference between pedals. Also, avoid placing your pedalboard near electronic devices that can cause signal noise.
How do I power all my pedals without running out of outlets or batteries?
Using a dedicated power supply designed for pedalboards is the best way to power multiple pedals. Look for one with isolated outputs to prevent noise and ensure each pedal gets the right amount of power without draining batteries.
Why does my pedalboard suddenly stop working during a gig?
If your pedalboard stops working, first check all connections and cables to ensure they are secure. Make sure your power supply is functioning correctly, and check for any faulty pedals by removing them from the chain one by one to identify the problem.
How do I prevent my pedals from slipping or moving around on the board?
Use high-quality Velcro or dual lock tape to secure your pedals to the board. For heavier pedals, you may consider mounting brackets or zip ties. Keeping your pedalboard on a flat surface and avoiding abrupt movements will also help prevent shifting.
What should I do if my pedals don't seem to be working as expected?
If a pedal isn’t working properly, check the battery or power supply first. Make sure the input and output jacks are securely connected. If the issue persists, try using the pedal with a different cable or guitar to rule out other potential problems.
How can I maintain my pedalboard to ensure it lasts?
Regularly clean your pedalboard and pedals with a soft cloth to remove dust and debris. Check cables and connections frequently for signs of wear or damage, and replace them if needed. Keep your pedalboard away from extreme temperatures or moisture to prevent damage.


Share:
Why a Modern Musician Should Use Blackstar Amplifiers
An Overview of Collings Guitars: 9 Benefits of Getting One