


To put on a capo, choose your fret, open the capo, and clamp it straight across all six strings just behind the fret wire (on the headstock side), using only enough pressure for every string to ring clearly. Then check each string with the tuner, because clamping nearly always nudges the pitch a little.
That takes about ten seconds once you’ve done it a few times. Getting it right, with no buzzing, no sharp strings and no dull notes, is a matter of three details: position, pressure and a quick retune. This guide covers each, then shows what the capo does to your chords so you know why you’re using one at all.
Table of Contents
- What a capo actually does
- What you need before you start
- How to put on a capo, step by step
- Treble side or bass side: which way round?
- Choosing the right type of capo
- What key you get at each fret
- Why beginners like capos
- Fixing the common problems
- Our view: a capo is only as good as your guitar’s setup
- Get the right capo, and a guitar that works with it
- Going further with a capo
- FAQ
- Sources
What a capo actually does
A capo clamps across the neck and works like a movable nut. It shortens the vibrating length of every string, so each open string sounds higher. Every fret is one semitone (a half step), as D’Addario explains in its capo guide, so a capo at fret 1 turns an open E into F, and an open A into A♯/B♭.
The practical upshot: you keep playing the chord shapes you already know, but the song sounds in a higher key. That is why a capo is so popular for singers who need a song raised to suit their voice, and for beginners who want to avoid awkward barre chords.
What you need before you start
- A capo that suits your guitar (more on that below)
- A tuner, either a clip-on or a phone app
- Reasonably fresh strings. Old, dead strings go out of tune more easily under a capo and sound dull
If you don’t own a capo yet, our accessories range includes several types. Our own step-by-step page, how to put a capo on a guitar, also has three short drills for clean changes.
How to put on a capo, step by step
1. Choose your fret
Decide which fret you need. If a song sheet says “Capo 2”, that means the second fret. Count from the nut, the strip at the top of the neck: the first fret is the first metal wire after it.
2. Hold the guitar steady
Rest the guitar on your knee or hold it in your playing position, with the neck angled so you can see the frets. Use your fretting hand to support the neck from behind, so you aren’t twisting it as you clamp.
3. Open the capo and place it
Squeeze the arms (on a trigger-style capo) or loosen the screw or dial (on other types) so the capo opens wide enough to go over the neck. Bring it in with the bar over the strings and the padded part resting on the back of the neck.
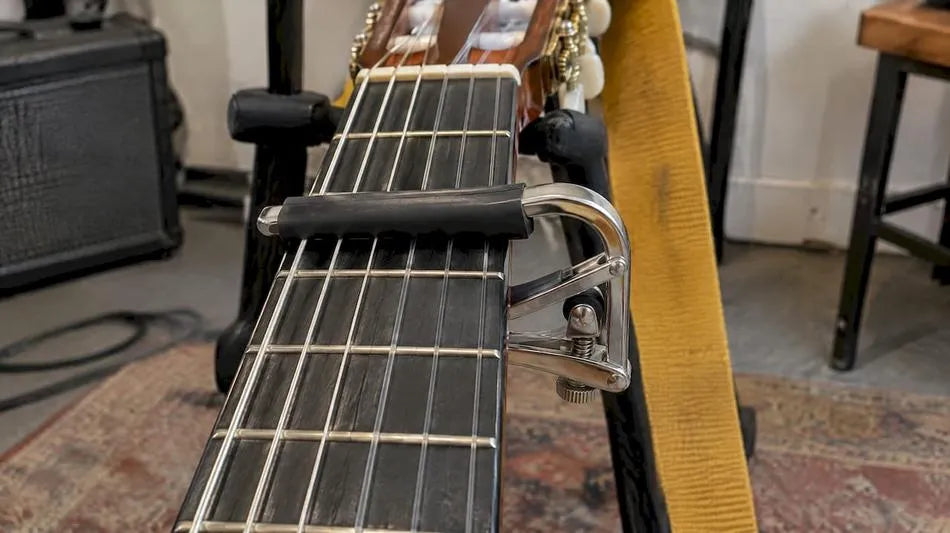
The bar needs to be parallel to the fret wires, not tilted. A slanted capo presses unevenly, which is the commonest cause of one string buzzing while the others ring.
4. Sit it just behind the fret
Place the bar close to the fret wire on the headstock side, so it sits in the space between your target fret and the one before it, but tight against the target fret. Not on top of the metal and not in the middle of the gap. G7th’s explanation of capo physics notes that strings are harder to deflect near their support points, which is why a capo placed just behind the fret avoids pulling the strings further out of tune.
The fault runs both ways. Too far back and the string can buzz, because it isn’t clamped firmly against the fret. On top of the fret wire and the capo can mash the strings down and make them sound flat or choked.

5. Release or tighten with minimum pressure
On a trigger capo, release the arms and let the spring do the work. On a screw or micrometer-style capo, tighten until the strings ring out cleanly and no further. For D’Addario’s micrometer-style capos, the brand’s own instructions say to turn the tension dial until the strings ring clearly without buzzing.
Extra squeeze doesn’t improve the tone. It stretches the strings and pulls the pitch sharp, and that is the second most common complaint beginners have.
6. Pluck each string and retune
Play each string open, one at a time, listening for buzz or a dead note. Then check the tuner. Even with perfect placement, most guitars drift slightly sharp, so tune the guitar with the capo on, not before. If one string is consistently sharp, ease the pressure off a touch and check again.
7. Take it off when you’re done
Don’t leave a capo clamped on for storage. It keeps the neck under tension and can mark the finish over time. Clip it on the headstock or put it in your case pocket instead.
Treble side or bass side: which way round?
You’ll see players apply a capo from either side of the neck. Shubb says either approach is correct, and professionals are split roughly 50-50. What matters is that the capo goes on parallel to the frets and directly over the strings.
Try both. If you use a trigger capo, whichever hand feels natural for one-handed fitting is the right one. Many players find it easiest to hold the capo in the fretting hand, squeeze with the fingers, and drop it on with the thumb behind the neck.
Choosing the right type of capo
Capo style affects how easy it is to put on and how clean the result is. Here’s how the main types compare.
| Type | How it fits | Best for |
|---|---|---|
| Trigger / spring | One-handed squeeze and release | Quick changes on stage or while playing along |
| Screw or dial | Tighten by hand until strings ring | Fine control of pressure |
| Lever (cam) | Flip the lever to lock | Fast and consistent pressure |
| Partial | Covers only some strings | Creative open-tuning-style voicings |
We stock Shubb lever capos in different neck profiles: the acoustic C1, the electric C4 and the classical C2. The difference is the curve of the bar and the pad. Electric necks usually have a more curved fretboard than classical ones, which are nearly flat and wider, so a capo built for one can behave badly on the other.
If you want something a bit different, a partial capo such as the Kyser partial acoustic or the Shubb partial C7B covers only some of the strings, letting others ring open. It is handy once you want drone-style sounds without retuning the whole guitar.

What key you get at each fret
The rule is simple: the capo raises every string by one semitone for each fret. That means the chord you play sounds that many semitones higher than its name suggests. Using G shapes as an example:
| Capo fret | G shape sounds as |
|---|---|
| 1 | A♭ (G♯) |
| 2 | A |
| 3 | B♭ (A♯) |
| 4 | B |
| 5 | C |
That answers the two most common questions. With a capo on the second fret, a G shape sounds as A, and with it on the third, the same shape sounds as B♭. If you play a C shape with the capo on the second fret, you get D. It works for the whole chord family, so a song in G (G, C, D, Em) with a second-fret capo comes out in A (A, D, E, F♯m).
Note that a capo can only raise pitch. It cannot take a song lower, so if you need a lower key, you’d have to retune the guitar down instead.
How to read a capo chord chart
Treat the capo as the new nut. Chord names and tab on a “Capo 2” chart are written relative to the capo, so you play them as if the capo were the top of the neck. The song’s real key is higher by the fret number.
If you want to work the other way, starting from the key a singer needs, count the semitones up from the original key to the new one. Then choose the easiest open shapes that are that number of frets below.
Why beginners like capos
A capo gives you a way to play a song in a comfortable key without learning difficult barre chords first. You keep the open shapes you already know and the capo handles the rest. It also helps with songs that sit awkwardly for your voice. Move the capo up or down a fret until the melody fits.
One caution: a capo is not a replacement for learning barre chords. It’s a musical tool, and many good players use one for tone as well as convenience, because open-position chords with a capo ring differently from barre shapes lower down the neck. Once you can capo confidently, playing with others is where it pays off, and guitar clubs for players are a good way to try it in a group where everyone has to agree on a key.
Fixing the common problems
Strings buzzing
Check three things in this order. First, is the capo parallel to the frets? Second, is it tight behind the fret rather than halfway down the gap? Third, is the pressure enough? A little more may help, but only a little. If only the outer strings buzz, the bar’s curve may not match your neck’s radius, and a capo made for your guitar type is the fix.
Notes sounding sharp
Too much pressure stretches the strings, and so does a capo set too far from the fret wire. Loosen it, reposition it right behind the fret and retune.
Still out of tune on an acoustic
Yamaha’s guide to capo use points out that strings set too high at the nut can be a reason an acoustic goes out of tune with a capo on. If that sounds like your guitar, it’s a job for a professional setup, not a heavier capo.
The capo slips or feels loose
A worn pad or a bar that doesn’t suit your neck’s width is the usual culprit. Check that the capo fits your neck: classical guitars have wider, flatter necks than most steel-string acoustics.
Our view: a capo is only as good as your guitar’s setup
We look over every instrument that comes through our Huntingdon shop, and the same pattern shows up when customers bring in a guitar that “won’t stay in tune with a capo”. More often than not the capo isn’t the problem. The nut slots, the string height or tired strings are. A capo exaggerates anything slightly off, so a guitar with a good setup tends to sound better with one on.
Our advice, in short:
- Fit the capo that matches your neck, not the cheapest one on the shelf.
- Use the lightest pressure that gives a clear note.
- Retune every time you move the capo, and take it off between sessions.
- If you’re fighting buzz and tuning problems at every fret, have the guitar looked at. Our guide to five signs your guitar needs a setup is a good place to start.
— Music
Get the right capo, and a guitar that works with it
If you’d like to try a capo before buying, you can come into our Huntingdon store and test a few on your own guitar. Online, our accessories collection has capos for acoustic, electric and classical necks, and if your guitar needs a tune-up we also offer setups, servicing and repairs through MusicStreet. New strings make a noticeable difference to tuning stability under a capo, so take a look at our guitar strings and in-store restring service too.

Going further with a capo
Once the basics feel natural, a few next steps are worth trying:
- Practise quick changes. Put the capo on and off a few times at different frets until it takes a second, and try our drills for clean changes.
- Learn the fit details. Our guide to capo fit, fret choice and tuning goes deeper on choosing a fret.
- Explore chord shapes. Our article on placement, tuning and chord shapes shows how shapes transform at each fret.
- Try alternative tunings. A capo pairs well with open tunings, and our guide to open D tuning is a good start. If you play heavier styles, see how to tune to Drop C.
FAQ
Where exactly should a capo go on the fret?
Just behind the fret wire you want, on the headstock side, so it sits close to the metal without covering it. Not on top of the fret and not in the middle of the gap. That position gives the cleanest note with the least pressure.
What key is a capo on the second fret?
A capo on the second fret raises everything by two semitones. A G shape sounds as A, a C shape sounds as D, and so on. Your chord shapes stay the same; only the sounding key changes.
What key is a capo on the third fret?
Three semitones higher. A G shape sounds as B♭ (A♯), and a C shape sounds as E♭. Because it’s a minor third, many singers find it a handy step up from a song in G.
Is a capo good for beginners?
Yes. It lets you play a song in a more comfortable key using chord shapes you already know, which means fewer awkward barre chords while you build strength. Just learn to put it on correctly and retune, so it helps rather than causing buzz.
Can a capo damage my guitar?
A well-fitted capo used with light pressure is fine. Avoid leaving it clamped on the neck when you store the guitar, as prolonged pressure can mark a finish. Take it off after playing and clip it to the headstock or keep it in the case.
Sources
- Applying The Capo, Shubb Capos
- How To Put a Capo on a Guitar, D’Addario
- How to Use Guitar Capos, D’Addario
- Capo Physics: Positioning your capo, G7th
- The Art of Using a Capo, Yamaha Music
- Guitar Clubs for Players: Where to Join and How to Start




Share:
7 Guitar Amp Buzzing Noise Fixes You Can Try Today