

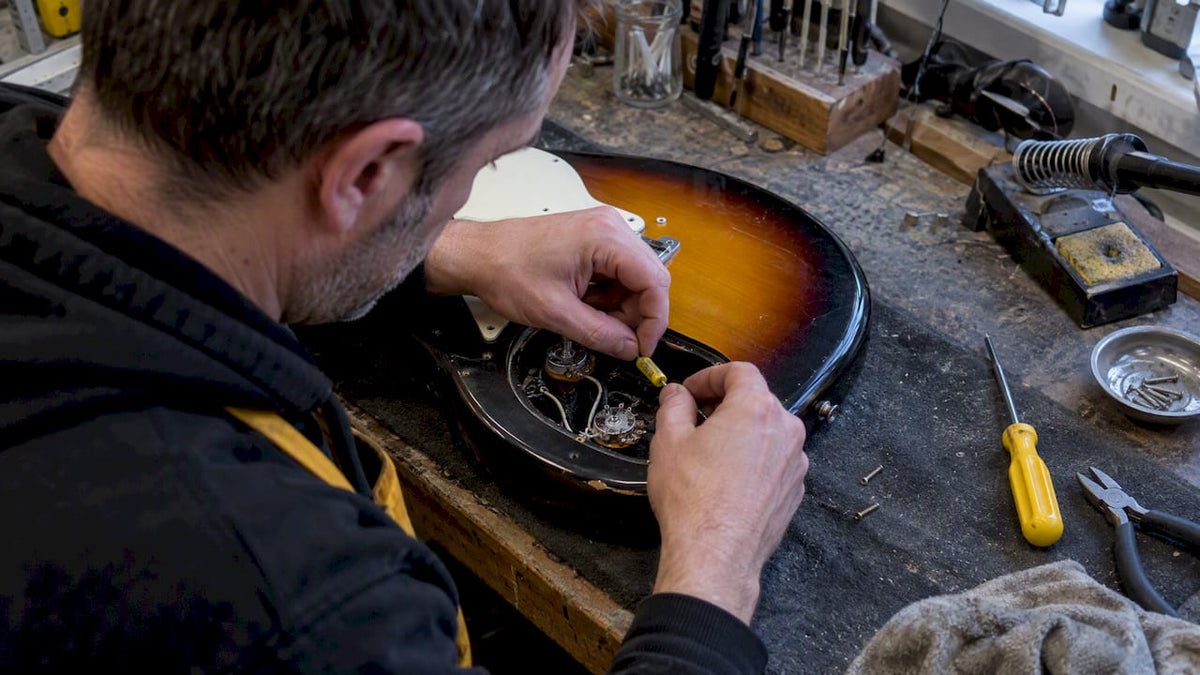
Try '50s wiring, or fit a switchable version of it, to stop your tone fading when you turn the volume down. It is the first mod most players reach for because it changes how the tone circuit and volume pot interact, without needing new pickups. If you are replacing parts anyway, a Dimarzio Custom Taper Potentiometer, 250K, 500K or push/pull version gives you a solid base. Below, we cover the wiring, the testing and the trade-offs in full.
Table of Contents
- How a tone pot is wired: parts and basic connections to identify
- Modern vs '60s vs '50s wiring: what changes and why it matters
- Step-by-step wiring for the common changes: swap to '50s and make it switchable
- Choosing caps, pot values and tapers for the tone you want
- Other mods: no-load pots and treble-bleed networks
- Tools, safety and bench tests to verify your wiring
- MusicStreet services that make this easier
- The electrical principles behind tone pot wiring
- Troubleshooting common tone pot issues
- De-soldering and replacing a tone pot: a step-by-step guide
- Measuring pot resistance and capacitance with a multimeter and LCR meter
- Pot quality and materials: carbon, cermet and solid shaft
- Why the '50s wiring debate misses the point
- Buy the right pots and book a fitting at MusicStreet
- FAQ
- Sources
How a tone pot is wired: parts and basic connections to identify
A tone pot has three lugs: an input lug, a wiper (output) lug and a ground lug. On most guitars, the input lug takes a wire from the pickup selector or volume pot, the wiper lug feeds the tone capacitor, and the ground lug connects to the pot casing and the rest of the earth network.
The tone cap sits between the wiper lug and ground. As you turn the pot down from 10, more of the signal’s high end gets shunted to ground through that cap, which is why rolling off tone makes the sound darker rather than quieter.
In a typical layout, the tone circuit taps off the output side of the volume pot, so the volume and tone controls interact rather than working in isolation. This junction is exactly what changes when you move from modern to '50s wiring.
Before you touch a soldering iron, get familiar with what is already in the cavity:
- Check the pot value stamped on the back casing: usually 250k or 500k.
- Note the taper type, audio (log) or linear, often printed as “A” or “B” on the pot body.
- Photograph the wiring from two angles and label each wire with masking tape before desoldering anything.
- Note which lug the ground wire and cap are currently on, since this differs between modern and vintage-style wiring.
Modern vs '60s vs '50s wiring: what changes and why it matters
Three wiring schemes come up again and again in guitar forums and repair shops, and each produces a noticeably different feel on the volume knob.
Modern wiring takes the tone cap straight from the pickup side (input) of the volume pot. It is simple and predictable, but it tends to lose treble as you turn the volume down, because the tone and volume circuits load each other more directly.
'60s wiring is close to modern wiring in most practical respects, with minor differences in how the ground paths are routed on some guitars, but it shares the same treble roll-off tendency as volume drops.
'50s wiring moves the tone cap connection to the wiper (output) lug of the volume pot instead of the input lug. According to Premier Guitar’s Mod Garage, this single change helps preserve treble when you roll the volume down and gives smoother interaction between the two controls.
- Modern wiring: simple, widely used, loses treble as volume drops.
- '60s wiring: broadly similar behaviour to modern wiring with small grounding differences.
- '50s wiring: cap taps the volume wiper, treble holds up better at lower volume settings.
Taper matters as much as the wiring scheme. Mod Garage notes that audio taper pots in the 60:40 or 70:30 resistance ratio range feel smoother across their sweep than steeper 90:10 modern audio tapers, and that '50s wiring tends to suit these gentler tapers better than it suits very steep ones.
The trade-offs are modest but worth knowing. '50s wiring does not add noise or hum on its own, and it does not conflict with standard shielding. Where it does interact is with treble-bleed networks: because '50s wiring already protects treble through the volume sweep, adding a treble-bleed cap on top can sometimes make the top end feel thin or overly bright, so many players choose one approach or the other rather than stacking both.
Step-by-step wiring for the common changes: swap to '50s and make it switchable
Converting to '50s wiring, or wiring in a switch so you can flip between modern and '50s on the fly, is a manageable weekend job if you take it slowly and keep notes as you go.
Preparation
- Loosen the strings and remove the control plate or pick guard screws so you can access the cavity.
- Photograph the existing wiring from at least two angles before you move anything.
- Label every wire with a small piece of masking tape noting where it currently connects.
- Let your soldering iron reach a stable working temperature before touching any joint.
Swapping modern to '50s wiring
- Identify the wire currently running from the tone cap to the input lug of the volume pot.
- Desolder that wire and move it to the wiper (middle) lug of the volume pot instead, which is the change Premier Guitar’s Mod Garage describes as the core of '50s wiring.
- Reflow the joint with fresh rosin-core solder rather than relying on the old solder alone, since reheating old joints without adding fresh solder often leaves a dull, unreliable connection.
- Leave the ground lug and the cap-to-ground connection untouched, since those do not change between schemes.
Making it switchable
- Fit a push/pull pot or a small SPDT/DPDT toggle in place of a standard pot if you want to flip between wiring schemes without a second repair.
- Wire the switch so one position routes the cap to the input lug (modern) and the other to the wiper lug ('50s), following the same lug logic as the manual swap above.
- On many Telecaster-style control plates, this can be done as a single-wire swap, which Premier Guitar describes as one of the simplest and least invasive versions of this mod.
Pro Tip: Before you commit to drilling for a push/pull pot, test the '50s wiring with a temporary jumper wire so you can hear the difference before deciding whether the switchable version is worth the extra work.
If you want to restore original wiring afterwards, your labelled photographs make this a five-minute job: simply move the cap wire back to its original lug and resolder. After any change, plug into a practice amp and sweep the volume knob from 10 down to 2 while listening for the treble content holding up, which is the quickest way to confirm the mod worked.
Choosing caps, pot values and tapers for the tone you want

Cap value decides how dark your tone gets when you roll the pot back, and picking the wrong one is the most common reason a tone mod disappoints.
A 0.022µF cap, common on many Gibson-style guitars, produces a noticeably dark, almost muffled tone at full roll-off. A 0.01µF cap sits in the middle, giving a usable warm tone without losing too much clarity. A small 0.001µF (3.3nF) cap gives only a subtle high-frequency trim, useful for players who want to tame harshness without losing presence, as Premier Guitar notes when comparing cap values.
Pot value changes the overall frequency balance of your guitar as much as your switch position does:
- 250k pots are the usual choice with single-coil pickups, keeping the top end slightly rounder.
- 500k pots are the usual choice with humbuckers, preserving more top end that would otherwise be lost through the pickup’s higher inductance.
- Audio (log) taper feels smoother and more usable across most of its travel than linear taper, which tends to do most of its work in a narrow band near the middle.
For a smoother feel on both volume and tone, look for audio taper pots in the 60:40 to 70:30 resistance ratio rather than steeper 90:10 modern tapers, a distinction Mod Garage draws out clearly. If you are shopping for replacement parts, the Dimarzio Custom Taper Potentiometer, 250K and Dimarzio Custom Taper Potentiometer, 500 K are both built around this gentler taper profile.
Other mods: no-load pots and treble-bleed networks
A no-load pot is wired so that turning the tone control fully to 10 physically disconnects the tone circuit altogether, bypassing the cap rather than just minimising its effect. The wiring change simply lifts the cap connection from the circuit at the final detent, which some players prefer because it removes any loading effect on the pickup at full tone.
Treble-bleed networks sit across the volume pot’s input and wiper lugs and keep high frequencies present as you turn volume down:
- A single small capacitor, often around 0.001µF, is the simplest treble-bleed option.
- A capacitor paired with a resistor (commonly in the range of a few hundred kilohms) gives a more even response across the sweep than a cap alone.
- Treble-bleed networks are most useful with modern wiring, where treble loss on volume roll-off is more pronounced.
Pro Tip: Fitting both '50s wiring and a treble-bleed network at once often makes the top end feel too bright or thin, since both circuits are solving the same problem; a switchable wiring setup lets you choose one approach at a time instead.
As Premier Guitar notes, '50s wiring can achieve a similar treble-preserving result to a treble-bleed network without the extra components, which is worth bearing in mind if you want to keep the wiring simple.
Tools, safety and bench tests to verify your wiring
A clean, well-prepared bench makes the difference between a mod that works first time and one that needs reopening.
- Use a temperature-controlled soldering iron, rosin-core solder, wire strippers and a length of heatshrink tubing for any exposed joints.
- Keep a digital multimeter to hand for continuity checks and resistance readings on pots before and after the work.
- Work in a ventilated space, keep your amp unplugged while soldering, and avoid cold joints by heating the lug itself rather than just melting solder onto it.
- Once reassembled, check continuity between each lug and its intended connection point before closing up the cavity.
- Sweep the pot with your multimeter in resistance mode to confirm it reads close to its rated value across its travel, flagging any dead spots.
- Plug into headphones or a small practice amp and test both volume and tone sweeps before fitting the control plate back on permanently.
MusicStreet services that make this easier
If soldering is not something you want to take on yourself, we offer guitar setups, servicing and repairs that cover wiring mods like these, alongside expert inspection of your instrument before and after the work. We stock the Dimarzio Push/Pull Potentiometer, 500K, Audio Taper and the 250K and 500K custom taper versions if you would rather buy the part and book a fitting than reach for the iron yourself. Orders above a minimum amount ship free within the UK, and warranty cover means any fitting carried out is backed by support afterwards.
The electrical principles behind tone pot wiring
A tone control is, at its simplest, a low-pass filter built from a resistor and a capacitor. The pot acts as a variable resistor, and the cap provides a fixed path to ground for high frequencies. Together they set a cutoff point above which signal gets drained away rather than reaching the amp.
As Guitar Chalk explains, the cap’s value sets how low that cutoff frequency sits: a larger cap drains more of the mid and high range, which is why big values like 0.022µF sound darker than small values like 3.3nF. The pot’s position decides how much resistance sits in series with that cap, so turning the knob down increases the proportion of signal that takes the low-resistance path to ground through the cap rather than continuing on to the amp.
The pickup itself plays a part too. A pickup’s inductance interacts with the tone cap’s capacitance to form a resonant peak, the frequency at which the pickup’s natural output is highest. Where in the circuit the cap taps into the signal path, whether straight from the pickup or after the volume pot’s wiper, changes how that resonant peak behaves as you adjust the volume, which is the underlying reason '50s and modern wiring sound different from each other at lower volume settings.

Troubleshooting common tone pot issues
A scratchy pot, where you hear crackling as you turn the knob, is usually down to dirt or oxidation on the resistive track inside the pot rather than a wiring fault. A shot of contact cleaner through the pot’s access slot, worked in by turning the shaft back and forth, clears this in most cases.
A dead spot, where part of the knob’s travel produces no change in tone, points to a worn section of the resistive track or a poor solder joint on one of the lugs. Reflowing the joints with fresh solder solves it if the problem is electrical; a true dead track means replacing the pot.
Hum or buzzing that changes when you touch the strings usually traces back to a grounding issue rather than the tone pot itself, often a loose ground lug or a missing connection between the pot casing and the rest of the earth network. Check every ground point with a multimeter before assuming the pot is faulty.
Total silence from the tone control, where turning it does nothing audible at all, often means the wiper lug connection has come loose or the cap has failed open-circuit. Reseating the wire on the wiper lug and testing the cap with a multimeter is the fastest way to narrow this down.
De-soldering and replacing a tone pot: a step-by-step guide
Replacing a worn or scratchy pot follows the same careful sequence every time, whichever guitar you are working on.
Start by photographing the existing wiring and labelling each wire before you desolder anything, since this is your reference if anything goes wrong partway through. Heat each joint on the old pot until the solder flows freely, then draw the wire away rather than yanking it, which avoids damaging the wire insulation or neighbouring joints.
Once the old pot is free, loosen its retaining nut and lift it out of the control cavity. Fit the replacement pot through the same hole, checking the shaft length matches your knob and control plate before tightening the nut back down.
Resolder each wire to the same lug position it came from on the original pot, using your photographs and labels as the guide, then add fresh rosin-core solder to each joint rather than reusing old solder residue. Trim any excess wire and add heatshrink over exposed joints where wires sit close together in the cavity.
Finish by checking continuity across each connection with a multimeter before closing up the cavity, then test the control through its full range on a practice amp.
Measuring pot resistance and capacitance with a multimeter and LCR meter
A multimeter in resistance mode is the simplest way to check a pot is within spec. With the pot disconnected from the circuit, measure across the two outer lugs: the reading should sit close to the pot’s rated value, whether that is 250k or 500k. Measuring from the wiper lug to either outer lug while slowly turning the shaft should show a smooth, continuous change with no sudden jumps or dropouts, which is how you spot a dead spot or worn track before it causes problems in the finished guitar.
An LCR meter goes a step further and reads capacitance directly, which is useful if a cap’s printed value has worn off or you are unsure whether an old cap has drifted from its original value. Measuring a tone cap in isolation, with it desoldered from the circuit, gives the most reliable reading, since components still wired in can produce false results from the rest of the circuit.
If you do not have an LCR meter to hand, a multimeter with a capacitance setting will give an adequate reading for most guitar caps, which sit in the low nanofarad to microfarad range. Either way, checking actual values before you commit to a mod avoids the common mistake of assuming a cap is the value printed on it when age or a previous repair has changed the real figure.
Pot quality and materials: carbon, cermet and solid shaft
Pots inside guitars are usually built with either a carbon composition track or a cermet (ceramic and metal) track, and the choice affects both feel and lifespan. Carbon pots are the traditional choice, found in most vintage-style wiring, and they give a familiar, slightly soft feel through the sweep. Cermet pots use a more durable track material that resists wear and moisture better over time, which tends to show up as fewer scratchy or dead-spot problems after years of use.
Shaft construction matters too. A solid shaft pot, common on many higher-quality replacement parts, tends to feel sturdier under a knob than a split shaft, which can develop play or wobble over time as the knob’s grip loosens on the splines.
None of these differences change the underlying wiring principles covered earlier: a cermet pot with a solid shaft still wires up the same way as a carbon pot with a split shaft. The difference shows up in how the control feels years down the line and how often you will need to clean or replace it, rather than in the tone it produces on day one.
Why the '50s wiring debate misses the point
Most discussion of tone pot wiring treats '50s wiring as a magic fix, as though swapping one wire transforms a guitar’s character. It does not. What it actually does is correct a specific, narrow problem: treble loss when you turn the volume down. If that is not a problem you have noticed on your own guitar, the mod will not be worth the time.
The bigger oversight in most guides is taper. Players fixate on the wiring scheme while ignoring that a steep 90:10 pot will feel abrupt regardless of which lug the cap sits on. Get the taper right first, in the 60:40 to 70:30 range, and the wiring choice becomes a smaller, more predictable adjustment on top of a control that already feels good.
Our honest view: try the '50s wiring as a reversible test before you commit to new pots entirely, and only reach for a switchable version or a full part swap once you know it solves a problem you can actually hear.
— Music
Buy the right pots and book a fitting at MusicStreet
If you have decided this mod is worth doing properly, we stock the exact parts covered above and can fit them for you. The Dimarzio Push/Pull Potentiometer, 500K, Audio Taper gives you switchable wiring in one part, while the 250K and 500K custom taper pots suit a straightforward swap.

Every pot we fit goes through our standard inspection and setup process, and orders over our free delivery threshold ship free within the UK. Book a setup or repair with us, or browse our electric guitars if you fancy trying the wiring on a fresh instrument altogether.
FAQ
What does '50s wiring actually change on a guitar?
'50s wiring moves the tone capacitor’s connection from the volume pot’s input lug to its wiper (output) lug. This single change helps the guitar retain more treble when you roll the volume down, according to Premier Guitar’s Mod Garage.
Which lug does the tone cap connect to?
In modern wiring, the cap connects to the input lug of the volume pot; in '50s wiring, it connects to the wiper (middle) lug instead. The ground wire and cap-to-ground connection stay the same in both schemes.
Should I use a 250k or 500k pot for my tone control?
250k pots are the usual choice with single-coil pickups, while 500k pots are the usual choice with humbuckers, since humbuckers generally need the extra top end that a 500k pot preserves. Either value works electrically with either pickup type, so the choice comes down to how bright or dark you want the result.
Can I make the '50s wiring mod switchable?
Yes, a push/pull pot or a small SPDT/DPDT toggle lets you flip between modern and '50s wiring without a permanent commitment. On many Telecaster-style layouts this can be done as a single-wire swap, as described by Premier Guitar.
Do I need a treble-bleed network if I use '50s wiring?
Not usually. Premier Guitar notes that '50s wiring can achieve a similar treble-preserving effect to a treble-bleed network on its own, and combining both often makes the tone sound thin.



Share:
Lower String Action: UK Guitarists, Check Relief Before the Saddle