


You read any guitar tab PDF by treating the six lines as strings, the numbers as frets (0 means open), and reading everything left to right. Stacked numbers are chords, played together. Most PDFs leave out rhythm entirely, so you fill that gap by listening to the recording and counting aloud. Annotate the file, practise in short loops, and the rest follows.
Table of Contents
- Visual basics: strings, frets and time on a tab PDF
- What do the symbols in guitar tabs mean?
- Using PDF tabs effectively: zoom, search, annotate and print for practice
- Step-by-step practice routine for mastering a phrase from a PDF tab
- How MusicStreet supports learners: printing, annotated tabs and professional setup
- How to interpret tablature for different guitar tunings
- Tips for beginners to improve sight-reading of guitar tabs
- How to identify and use alternate fingerings and positions in tabs
- The gap between what tabs promise and what they deliver
- Guitars and support for tab practice from MusicStreet
- Sources
- FAQ
Visual basics: strings, frets and time on a tab PDF
Every guitar tab, whether it’s a scanned photocopy or a properly engraved PDF, runs on the same three ingredients: strings, frets and time. Get comfortable with these and the rest of tab notation stops looking like code.
The tab stave has six horizontal lines, one per string. The bottom line is your low E string (the thickest one), and each line moving upward represents the next string up, finishing with the high e at the top. It’s a common trip-up for beginners because it looks upside down compared to how the strings actually sit on the guitar in your hands, but that’s simply the convention every tab you’ll find follows.
Numbers placed on a line tell you which fret to press. A 0 means play the string open, no fretting required. A 3 on the top line means fret the third fret on the high e string. Simple enough on its own, but tabs get their real information density from combining these.
- Single numbers in sequence mean notes played one after another, moving left to right exactly like reading a sentence.
- Numbers stacked vertically (one directly above another) mean play those notes together, forming a chord.
- Vertical bar lines across all six strings mark the end of a musical bar, mirroring standard notation.
- Blank space between numbers usually just represents time passing, though without rhythm marks you can’t always tell how much.
That last point matters. A tab tells you where to put your fingers, not always when. That’s the gap you’ll need the recording to fill, and it’s covered properly further down this page.
For a fuller breakdown of string names and how they relate to tuning, MusicStreet’s guide to guitar string names is worth a read before you go further.
What do the symbols in guitar tabs mean?
Once you’re past the basic strings-and-frets logic, the next barrier is the shorthand. Text-based tabs (the kind you copy and paste, or find on lyric sites converted to PDF) lean heavily on a small alphabet of characters to describe technique. Learn these once and you’ll never be stuck decoding a PDF tab again.
- h — hammer-on. Pick the first note, then tap the next fret with another finger without picking again.
- p — pull-off. The reverse: fret two notes, pick the first, then release your finger to sound the second.
- / and ** — slide. Move your finger up (/) or down () the fretboard to the next number without lifting off the string.
- b and r — bend and release. Push the string to raise pitch, then let it fall back.
- x — muted note. Strike the string without a clear pitch, usually for a percussive effect.
- ~ — vibrato. A slight, repeated pitch wobble on a sustained note.
- PM — palm mute, usually shown with a dashed line indicating how long to hold the mute.
Combined notations show up constantly, and this is where beginners often overthink things. A sequence like 5h7 means fret the fifth, pick once, then hammer onto the seventh without picking again. Treat these as one continuous technique symbol explained rather than two separate notes, because text-TAB characters function as articulation instructions, not as a request to strike the string twice.
Engraved PDF tabs, the kind produced by proper notation software, often show these same techniques with curved slur lines and small text labels above a standard music staff. That version usually carries rhythm information too, in the form of note stems and beams, which text tabs almost never include.
Pro Tip: Read the whole bar before you play it. Spotting an “h” or “p” three notes ahead changes your fingering choice for the notes before it, and reading one number at a time is the single biggest habit that slows beginners down.
Using PDF tabs effectively: zoom, search, annotate and print for practice
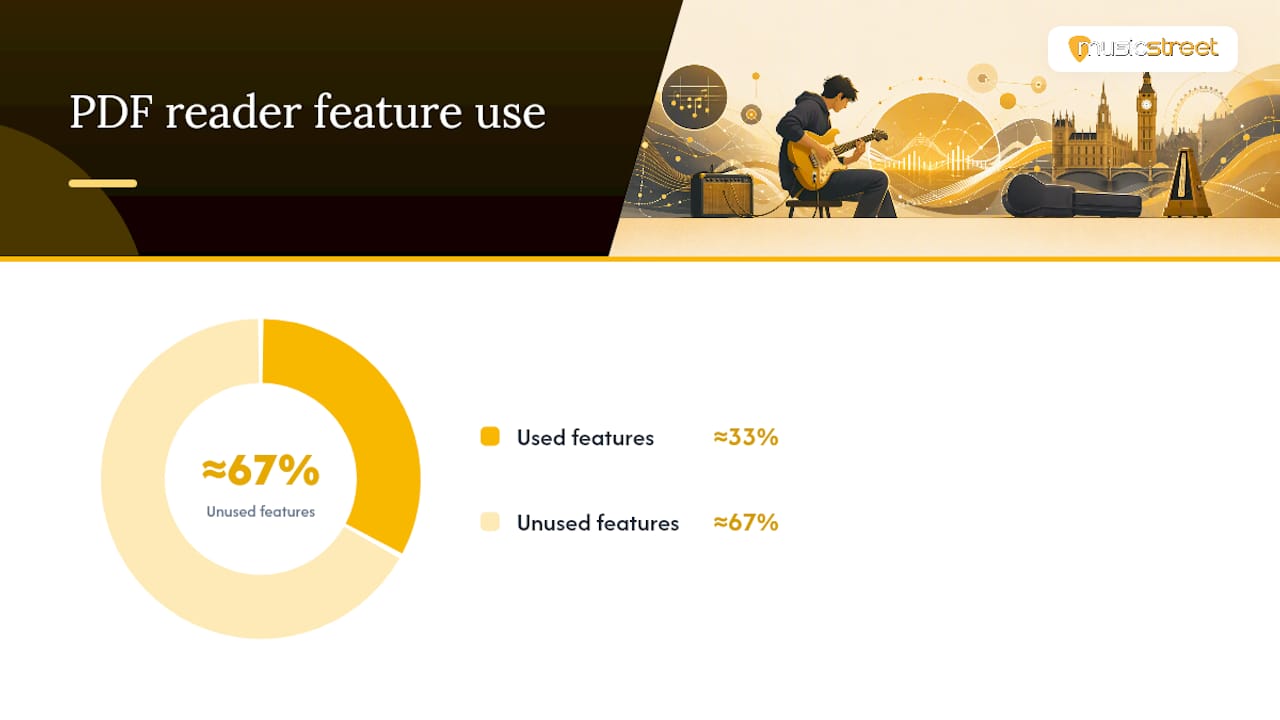
A PDF isn’t just a static picture of a tab. Treated properly, it’s a practice tool, and most learners use about a third of what their PDF reader actually offers.
- Zoom in on cramped sections. Tab numbers get printed small, especially in multi-page transcriptions, and squinting at a phone screen is a fast route to misreading a fret number.
- Use text search to jump to a repeated section or chorus instantly, rather than scrolling through six pages of verses to find the bridge.
- Highlight or annotate problem bars directly in the PDF. Most readers let you draw, circle, or add sticky notes, which turns a static file into a working practice document.
- Bookmark tricky passages so you can return to them without hunting through the whole song again.
- Switch to two-page view when a phrase spans a page break, so you’re not flicking back and forth mid-riff.
If you’re printing rather than reading on screen, layout matters more than people expect. Cramped staves with no white space above or below the numbers leave no room for technique symbols or your own fingering notes. Printable tab templates that give six to eight staves per A4 sheet tend to strike the right balance, leaving enough space for annotations both above the fret numbers (for technique marks) and below (for finger numbers). Set generous margins too. A tab pinned to the edge of the page is awkward to hold flat on a music stand.
Once printed or annotated on screen, mark rhythm where you can work it out by ear, pencil in fingerings for awkward stretches, and ring-fence a two- or four-bar loop for repeat practice. That loop becomes the unit you actually rehearse, not the whole song at once.
Step-by-step practice routine for mastering a phrase from a PDF tab
Reading the tab correctly is only half the job. Turning it into something your fingers can actually play needs a repeatable method, not just repetition for its own sake.
- Tune up and preview the phrase. Play through it once, slowly, without worrying about mistakes, just to see what you’re dealing with.
-
Identify the problem measures. Almost every phrase has one or two bars doing the heavy lifting, usually a stretch, a fast run, or a technique combo like
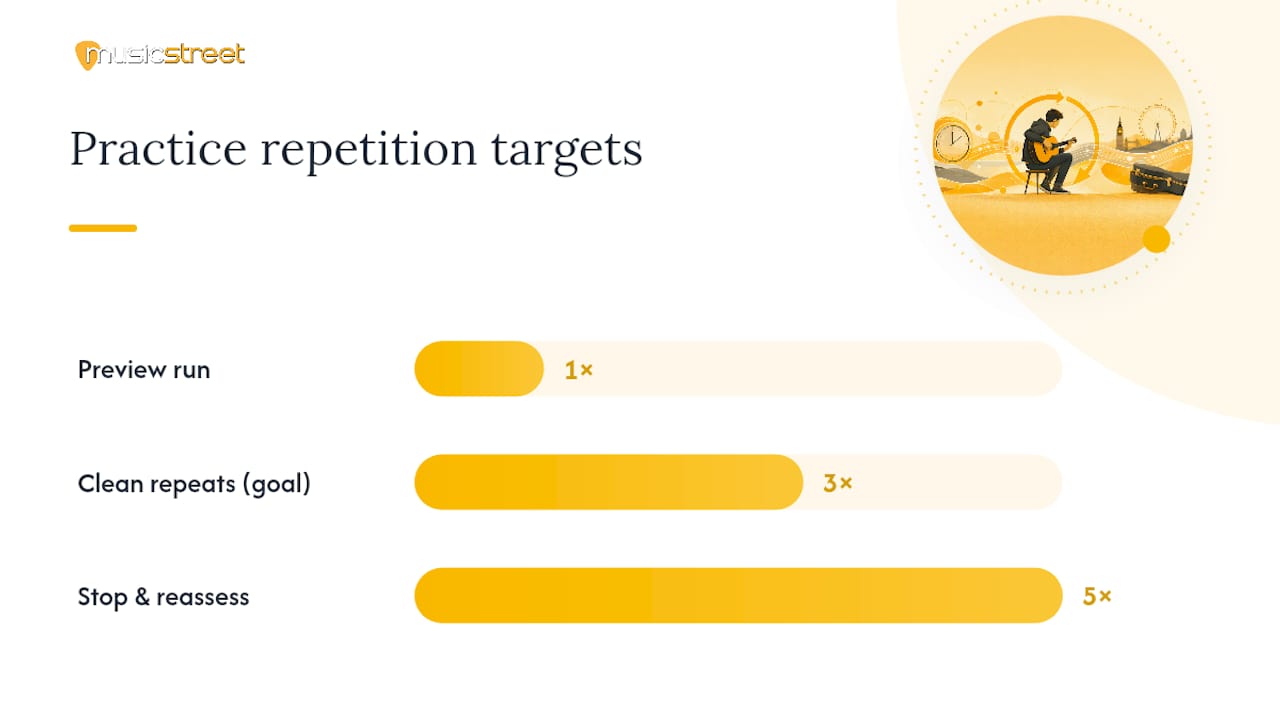
5h7p5. Isolate those bars rather than treating the whole line as equally hard. - Slow practice with a metronome. Drop the tempo until you can play the problem bar cleanly three times in a row. This feels tediously slow at first, which is exactly the point.
- Loop and increase tempo gradually. Once clean, nudge the metronome up by a few beats per minute and repeat. Small increments beat big jumps; jumping too fast usually just reintroduces the mistake you’d fixed.
When the PDF gives you no rhythm markings at all, which is common with text-only tabs, counting aloud is the most reliable fix. Say “1-and-2-and-3-and-4-and” while playing, matching each number or chord in the tab to a beat or half-beat. This is the same approach educators recommend when rhythm is unclear, and it works because it forces you to commit to a pulse rather than drifting.
For genuinely stubborn passages, print a blank stave and transcribe the phrase by hand from memory, checking back against the PDF only when you’re stuck. Manual transcription forces your brain to actively recall fret positions rather than passively scan them, and it tends to cement fingerboard knowledge faster than reading alone.
Pro Tip: If a phrase still isn’t sticking after five slow, clean repetitions, the tempo is too fast, not the phrase too hard. Drop ten more beats per minute before you try again.
How MusicStreet supports learners: printing, annotated tabs and professional setup
Reading a tab cleanly gets a lot harder on a guitar that’s fighting you: strings sitting too high, intonation drifting, or frets buzzing on every bend. MusicStreet’s educational content, including the beginner’s guide to reading tabs, covers the notation side, but the instrument itself matters just as much.
A professional setup adjusts action, intonation and neck relief so that fret numbers translate into clean notes without extra effort. That’s particularly noticeable when you’re practising hammer-ons and pull-offs slowly, where a poorly set-up guitar makes clean articulation almost impossible regardless of technique.
If you’re working through printed PDF tabs on an instrument that’s never been professionally inspected, booking a setup before a big practice push is a sensible order of operations. Cleaner playing makes every step in the routine above noticeably easier.
How to interpret tablature for different guitar tunings
Standard tuning (E A D G B e, low to high) is the default assumption behind almost every tab you’ll find, but plenty of songs use alternate tunings, and the tab itself won’t always warn you.
Drop D, for instance, lowers the sixth string a full step to D, while everything else stays standard. A tab written for drop D still shows a 0 on the bottom line for an open low string, but that open note now sounds a D, not an E. If you play that same tab in standard tuning, the numbers are technically correct but the pitch is wrong, and a song built around a droning low D riff will sound off.
Open tunings (open G, open D, open E and similar) go further, retuning several strings to form a chord when strummed open. Tabs written for these tunings rely entirely on you having retuned first; the fret numbers assume the new pitches, and playing them in standard tuning produces something unrecognisable.
The fix is straightforward: always check for a tuning note at the top of the PDF before you play a single bar. It’s usually written as a short string of letters (D A D G A D for open D, for example) just above the first stave. If no tuning is given and the song sounds wrong in standard tuning, search for the specific tuning by song title. Getting this one detail wrong wastes far more practice time than any technique symbol ever will.
Tips for beginners to improve sight-reading of guitar tabs
Sight-reading tab, glancing at a phrase and playing it in real time without stopping to decode each number, is a skill that builds with deliberate repetition, not just exposure.
Start by practising with tabs well below your playing level. If you can already play a riff from memory, reading a simplified version of it trains your eyes to scan ahead rather than lag behind your fingers, which is the actual bottleneck in sight-reading.
Work on reading in small chunks rather than note by note. Skilled readers glance at a whole bar, sometimes two, before playing any of it, the same way a fluent reader takes in a phrase rather than spelling out each letter. This is learnable: cover the next bar with a piece of paper while you play the current one, forcing yourself to commit the coming notes to short-term memory before you need them.
Keep a metronome running even during sight-reading practice, at a tempo slow enough that you’re never guessing. Rushing sight-reading practice just trains bad guesses, not accurate reading.
Finally, sight-read something new every session, even for two minutes. Familiarity with dozens of different fingering patterns, chord shapes and technique combinations builds a mental library that speeds up recognition on the next unfamiliar tab. MusicStreet’s collection of easy songs for beginners is a useful rotating source of fresh material for exactly this kind of practice.
How to identify and use alternate fingerings and positions in tabs
Tabs tell you the fret and string, but they rarely tell you which finger to use, and that’s often the difference between a phrase that flows and one that constantly trips you up.
The same note can usually be played in more than one position. A note on the twelfth fret of the low E string, for example, is the same pitch as the open E string an octave up, or the seventh fret of the A string. Tabs almost never flag these overlaps, so spotting them yourself is a genuine skill worth building.
Look ahead in the phrase before committing to a fingering. If the next few notes sit higher up the neck, choosing a fretting position further up now, even for a note you could technically play in an open position, often saves an awkward jump a beat later. This is especially relevant with slides and hammer-ons, where staying in one hand position across a 5h7/9 sequence is far smoother than repositioning between each note.
Pencil these choices directly onto your printed or annotated PDF as you work them out. Write the finger number (1 to 4, thumb rarely used) beneath the fret number, and mark which position (fret range) you’re playing in above the stave. This turns a generic tab into your own personalised fingering chart, and it’s exactly the kind of detail that manual transcription reinforces, since writing it out by hand forces you to make a fingering decision rather than skating past it.
The gap between what tabs promise and what they deliver
Most guides treat tab-reading as purely a decoding exercise: learn the symbols, learn the lines, done. That undersells the actual difficulty. The real skill isn’t reading the numbers, it’s supplying everything the tab leaves out, chiefly rhythm and feel, and most learners never get told this explicitly.
The conventional advice to “just read the tab” quietly assumes you already know how the song goes. That’s true for most tabs, since they’re written for songs people already want to play. But it means the tab and the recording were never meant to be separate tools. Treating a PDF tab as a standalone score, the way you might read sheet music cold, is the single most common misunderstanding among beginners, and it’s why so many people plateau early.
What should you prioritise first? Pairing every new tab with its recording, every single time, even for songs you think you already know well. Counting aloud feels awkward and a little silly out loud, but it’s the fastest route past the rhythm gap that trips up nearly everyone. Symbol memorisation matters far less than people assume; you’ll absorb h, p and / naturally within a few songs. Rhythm is the part that needs deliberate work.
— Music
Guitars and support for tab practice from MusicStreet
Cleaner tab reading starts with a guitar that responds properly to hammer-ons, slides and bends, and MusicStreet stocks instruments built for exactly that kind of practice, backed by in-house setup and inspection before anything leaves the shop.

Among the electrics suited to learners working through PDF tabs, the Gretsch G2420 Streamliner in Aged Brooklyn Burst offers a comfortable hollow-body feel with smooth playability across the neck. The Gretsch G5220 Electromatic Jet BT in Casino Gold suits players who want a solid-body single-cut with quicker access to upper frets, useful once your tab practice moves into higher positions. For something with a bit more character, the Gretsch G5410T Electromatic Rat Rod pairs a Bigsby vibrato with a rosewood fingerboard, ideal once you’re tackling bends and slides regularly.
Every guitar sold through MusicStreet is professionally inspected before dispatch, and setup or repair bookings are available for instruments you already own. Browse the current range or book a setup at Musicstreet to get your guitar practice-ready.
Sources
The core rules covered above draw on established lesson resources, including Ultimate Guitar’s tab reading guide, OpenFret’s beginner lesson, and the notation systems overview from Sitar Rajib for readers curious about notation beyond Western tab conventions. Check engraved tab examples whenever rhythm feels unclear.
FAQ
Do PDF guitar tabs show rhythm?
Most text-based PDF tabs don’t show rhythm at all; only engraved PDFs with a standard notation staff typically include note stems and beams for timing. When rhythm is missing, count aloud alongside the recording to learn the timing.
What’s the difference between guitar tabs and standard notation?
Tabs show which fret and string to play but usually skip rhythm and dynamics, while standard notation shows exact pitch and timing but requires reading music theory. Many players use tab for fingerings and the recording for rhythm.
Can I print a guitar tab PDF for practice?
Yes, and it’s genuinely useful. Choose a layout with six to eight staves per A4 page, leaving space above and below the numbers to pencil in fingerings and technique marks.
What does a number stacked on top of another mean in a tab?
Stacked numbers on a tab mean those notes are played simultaneously, forming a chord, rather than one after another.
How do I learn to read tabs faster?
Practise sight-reading with tabs below your current skill level, keep a metronome running, and pair every new tab with its recording rather than reading the tab in isolation.
Should I get my guitar professionally set up before practising tabs?
A proper setup makes technique-heavy tab passages, like bends and hammer-ons, far easier to execute cleanly, so it’s worth arranging through a service such as MusicStreet’s setup and inspection option before a serious practice push.




Share:
Loop pedals for beginners: 5 steps to start tonight, where to try
3 Bass Pickup Types and Which One Fits Your Gig or Studio