

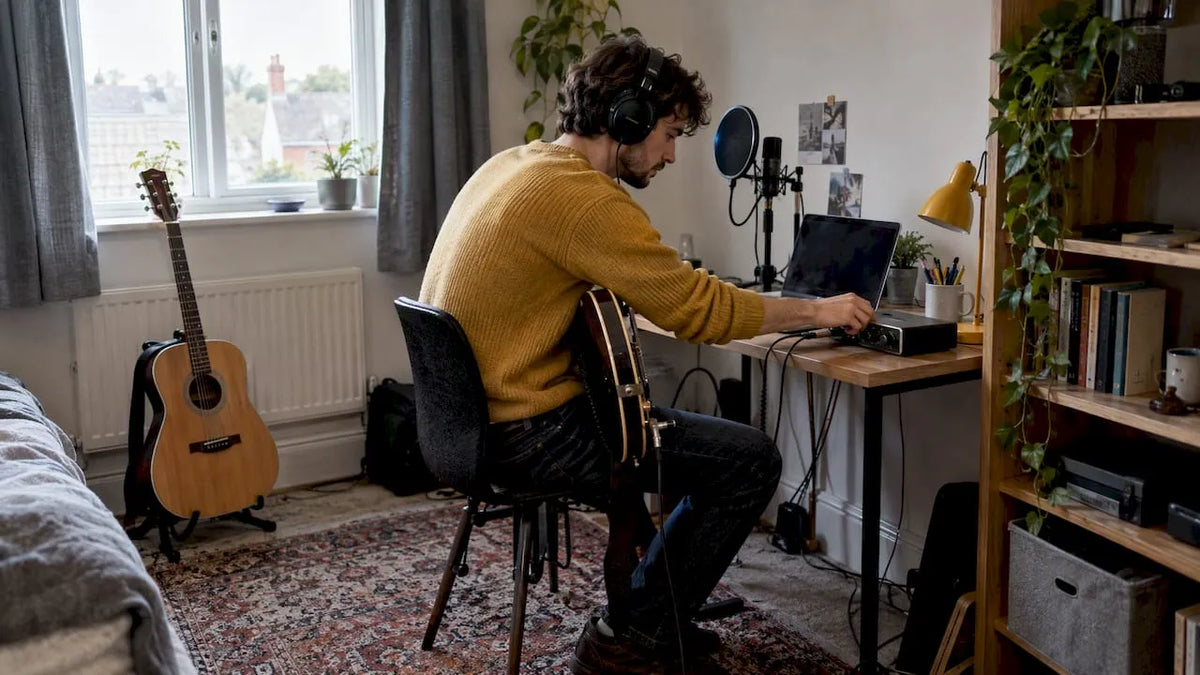
The smallest useful home studio is a computer, an audio interface, one microphone, and either headphones or monitors, plus some basic acoustic treatment. Pick a small, quiet room, start tracking on headphones if soundproofing isn’t an option yet, and build up from there. Specialist retailers can help with kit choices and setup advice once you know what you need.
Table of Contents
- Essential equipment: what to buy first and why
- Choosing a space and acoustic basics
- Step-by-step physical setup and signal flow
- Monitoring, speaker placement and mixing basics for small rooms
- Recording loud instruments: practical low-cost alternatives and strategies
- Budget breakdown: how much you’ll likely spend and where to save
- Common mistakes, quick fixes and basic troubleshooting
- How MusicStreet can help: setup, kit choices and local support
- Tips for optimising recording workflow and session organisation
- An overview of essential recording software, plugins and tools
- Start small, fix the room, then upgrade the gear
- MusicStreet starter kit options and how to get help
- FAQ
- Sources
Essential equipment: what to buy first and why
Your computer probably already works. Most laptops from the last five years run a digital audio workstation (DAW) without trouble, as long as you have 8GB of RAM and some free storage for recordings. Free DAWs like GarageBand (Mac) or Cakewalk (Windows) cost nothing and cover everything a beginner needs; paid options such as Ableton Live or Logic Pro add features you’ll grow into later.
The audio interface is where your money matters most. It converts your microphone or instrument signal into something the computer understands, and it determines how low your latency runs and how clean your preamps sound. A two-input interface with phantom power covers nearly every beginner scenario, letting you record a mic and a guitar at once if needed.

For microphones, the classic beginner split is dynamic versus condenser. Dynamic mics handle loud sources well and ignore room noise, which suits untreated spaces. Condenser mics capture more detail and sound better on vocals and acoustic instruments, but they pick up everything in the room too, including traffic and hum.
Headphones are non-negotiable for tracking, since they let you hear yourself without the microphone picking up the playback. Monitors matter more once you start mixing. According to a practical starter equipment guide, a basic usable rig built from a computer, DAW, interface, microphone and headphones is genuinely achievable on a modest budget, and starter bundles reduce the compatibility headaches that trip up first-time buyers.
For a starter bundle, the Mxl Usb Studio One pairs a USB condenser mic with the basics you need to start recording straight away. Stepping up, the Studio 24c gives you two clean preamps and simple routing for a first “proper” interface, while the Studio 26c adds extra output options for anyone planning to monitor through external speakers as well as headphones.
Round out the setup with a handful of small items:
- A pop filter to stop breath sounds from distorting vocal takes.
- A sturdy mic stand so you’re not propping a microphone on a stack of books.
- Balanced XLR and instrument cables, since cheap unbalanced leads are a common source of hum.
- A surge protector to keep your interface and computer safe from power spikes.
Choosing a space and acoustic basics
Soundproofing stops sound getting in or out of a room. Acoustic treatment controls how sound behaves once it’s already inside. They solve different problems, and beginners often buy the wrong one. Foam panels on the wall won’t stop your neighbour hearing a snare drum, and thick walls won’t stop a vocal take sounding boxy and harsh.
Picking the room comes first. A smaller, squarer room with carpet, curtains and furniture will almost always outperform a large, empty, hard-surfaced one, because bare walls and parallel surfaces bounce sound back into the microphone. Walk through your house at night and note which room is quietest: away from the street, the kitchen, and anything with a humming fridge or boiler.
Once you’ve picked a room, work through these steps:
- Clap once, sharply, and listen for a ringing echo. A strong “flutter” means too many hard, parallel surfaces.
- Identify the reflection points, the spots on the side walls and ceiling where a mirror held up would show your speakers or recording position.
- Place a rug on hard flooring and add soft furnishings such as curtains, bookshelves or a sofa.
- Add absorption panels at the reflection points, not spread evenly round the room.
- Treat the corners if you can, since bass energy builds up there more than anywhere else.
Industry guidance consistently backs this order of priorities. The Musicians’ Union notes that room treatment often delivers a bigger audible improvement than buying more expensive gear, with the largest gains coming from controlling reflections and adding absorption at those reflection points. Separate research on acoustic treatment backs this up directly: bass traps, absorption and diffusion aimed at reflection points and corners make a real difference, while decorative foam on its own does very little.
If you’re recording loud sources regularly and sharing a wall with neighbours, proper soundproofing (resilient mounting, mass-loaded barriers, sealed doors) becomes worth considering, and it’s a job for a live event production specialist rather than a DIY weekend. Check local guidance on noise-sensitive development if your studio use is regular or business-facing, since noise complaints can become a planning issue rather than just an awkward conversation.
Step-by-step physical setup and signal flow
Getting from a box of new gear to a usable session follows the same order every time, whatever your budget.
- Clear your desk and plan cable runs before you plug anything in. Keep power cables and audio cables separated to avoid picking up electrical hum.
- Install your interface’s drivers from the manufacturer’s website, then restart your computer before opening your DAW.
- In your DAW’s settings, select the interface as both input and output device, set the sample rate (44.1kHz is fine for most beginners) and choose a buffer size, starting around 256 samples.
- Connect your microphone or instrument to input one and select that input on a new track in your DAW.
- Play or sing at performance volume and raise the interface’s gain knob until the loudest peaks sit around minus 12 to minus 6 decibels on the meter, comfortably below clipping.
- Put on your headphones, enable monitoring on the track, and check you can hear yourself with a slight, natural delay rather than a noticeable lag.
- Record a short test take, play it back, and confirm there’s no distortion, no hum, and no dropouts.
- Save the session file and back up the recorded audio to a second location, whether that’s an external drive or cloud storage.
Pro Tip: Name your session file with the date and song title before you record anything, so a crashed computer or closed window never costs you a take.
If the buffer setting feels sluggish when you’re playing, lower it in small steps until the lag disappears; if you hear crackling instead, raise it again. That trade-off between latency and stability is normal, and every interface needs a bit of tuning the first time you use it.
Monitoring, speaker placement and mixing basics for small rooms
If you’re using studio monitors rather than headphones, set them up in an equilateral triangle: each speaker the same distance from you as they are from each other, at ear height when seated. Keep them at least 20 centimetres from the back wall, since low frequencies build up fast in corners and close to walls, according to monitoring and mixing guidance from Stanford’s CCRMA. That build-up is why a bass-heavy mix at home can sound thin everywhere else.

A quick check: if your mixes consistently sound muddy on other systems, suspect the room before you suspect your ears. Walk around while a bass-heavy track plays and listen for spots where the low end disappears or swells, which flags problem areas near walls and corners.
Track vocals and acoustic instruments on closed-back headphones to avoid bleed, but always cross-check a finished mix on headphones, monitors, and if possible a phone speaker, since each reveals different problems. Keep your fader gains moderate rather than pushed into the red, and compare your rough mix against a reference track you know well, in the same genre, to judge your balance honestly.
Recording loud instruments: practical low-cost alternatives and strategies
Acoustic drums and cranked guitar amps are the hardest things to record at home, because the volume that makes them sound good is also the volume that upsets neighbours and bleeds into every other microphone in the room. Proper isolation booths are expensive and rarely practical in a home setup.
The Music Producers Guild recommends amp simulation software, direct injection (DI) recording, and electronic drum kits as the realistic path for home hobbyists, rather than chasing soundproofing you can’t afford.
- Record guitar through a DI box and re-amp or use amp-sim software later, so you capture a clean, flexible signal at a safe volume.
- Try a tone capsule or modelling amp like the Roland BC TC-EJ Eric Johnson Blues Cube, which lets you get amp character at low volume.
- Swap acoustic drums for an electronic kit or high-quality drum samples when space or noise rules it out.
- If you do mic a loud amp, use close miking and a cheap gobo (a portable baffle) to cut bleed into other microphones.
- A smaller valve amp, such as a used Hughes & Kettner Tubemeister 18, still sounds great at bedroom volume.
Budget breakdown: how much you’ll likely spend and where to save
A genuinely functional starter studio, computer aside, is achievable without a large outlay, according to LCCM’s budget breakdown for home recording setups.
- Low budget: an entry-level interface, a single dynamic or USB condenser mic, and closed-back headphones.
- Mid budget: a two-input interface with better preamps, a condenser mic for vocals, a dynamic mic for instruments, and a pair of small monitors.
- Aspirational: multiple mic options, a larger-format interface, treated monitors, and proper acoustic panels throughout the room.
**Buying used reduces cost significantly across every category, from interfaces to monitors, and pre-loved listings are worth checking before buying new.
Prioritise your interface and your monitoring (headphones first, monitors later) over extra microphones or plugins, since those two items shape everything you record and everything you hear. Defer luxury upgrades like a second condenser mic or outboard hardware until you’ve used the basics enough to know what you’re actually missing.
Common mistakes, quick fixes and basic troubleshooting
Most early studio problems trace back to cables, gain, or the room, not the gear itself.
- A persistent hum usually means a ground loop: try a different power outlet, or a direct box with a ground lift switch.
- Crackling or distorted audio often means your buffer size is too low or your input gain is clipping; raise the buffer and pull the gain back.
- A thin or hollow vocal sound can mean the mic is picking up a reflected copy of itself off a nearby wall; move the mic or treat that wall.
- Unbalanced cables picking up interference near power leads should be swapped for balanced XLR or TRS cables.
Pro Tip: Coil and label your cables after every session. A tangled cable box costs you more setup time than almost anything else in a home studio.
A quick monthly routine, checking cable connections, dusting the interface, and confirming your backups actually completed, catches most problems before they ruin a session.
How MusicStreet can help: setup, kit choices and local support
Buying the right starter kit is easier with someone checking it over first. Specialist retailers inspect every instrument and piece of gear they sell, new or pre-loved, and back purchases with warranties and ongoing post-sale support. If you’re torn between the Mxl Usb Studio One, the Studio 24c and the Studio 26c, staff can talk through which fits your budget and room before you buy, especially if you’re considering a used unit.
Tips for optimising recording workflow and session organisation
A messy session slows you down more than any piece of gear. Before you record a note, set up a simple folder structure: one folder per song, with subfolders for raw takes, mixes and bounces. Name every file with the date, song title and take number, so you’re never guessing which version is which weeks later.
Inside your DAW, colour-code tracks by type (vocals, guitars, drums) and group them so you can mute or adjust a whole section at once. Set up a basic template with your usual input routing, track names and a rough gain stage already in place, so every new session starts from a working foundation instead of a blank slate.
Record in short, focused takes rather than one long pass, and label the best take clearly as you go rather than relying on memory at the end of the session. Leave a few seconds of silence before and after each take, which makes editing and trimming far less fiddly later.
Build backups into the habit, not as an afterthought. Save a copy to an external drive or cloud storage at the end of every session, and keep at least one backup physically separate from your main computer in case of theft, fire or a failed drive. A ten-minute habit after each session protects weeks of work.
An overview of essential recording software, plugins and tools
Your DAW is the hub, and most beginners already have more than they need built in. GarageBand, Cakewalk, and the free tiers of Ableton Live or Studio One all include basic EQ, compression, reverb and a reasonable set of virtual instruments without spending anything extra.
Beyond the DAW itself, a handful of plugin types cover almost every beginner mixing task: an EQ to shape tone and remove problem frequencies, a compressor to even out performance dynamics, reverb and delay for space and depth, and a limiter for keeping final mixes from clipping. Most DAWs ship with usable versions of all four, so there’s rarely a need to buy anything extra when you’re starting out.
Amp simulation plugins deserve a specific mention if you play guitar or bass, since they let you record usable tones directly into your DAW without a microphone or a loud amp in the room, which matters in a shared house or flat. A basic tuner app and a metronome, both usually built into your DAW, round out the essential toolkit. Everything beyond that, from drum sample libraries to vintage-style compressor emulations, is worth exploring once you’ve made several recordings with the basics and know what’s actually missing from your sound.
Start small, fix the room, then upgrade the gear
If you only do one thing before spending on gear, treat your room first. A cheap interface in a quiet, well-treated space will beat an expensive one in a room full of hard, bare walls every time. Come in and try a few options on the shop floor before you decide, since hearing the difference yourself beats reading any spec sheet.
— Music
MusicStreet starter kit options and how to get help

Starting small doesn’t mean starting alone. The Mxl Usb Studio One is a straightforward first step, and the Studio 24c or Studio 26c suit anyone ready for a proper interface. Every instrument and piece of kit is inspected before sale, and our guitar setups, servicing and repairs are on hand once you’re ready to track your own playing. Browse the range online or visit a local specialist store to talk through what fits your room and budget.
FAQ
How much would it cost to set up a recording studio?
A basic, functional home studio, computer aside, is genuinely achievable on a modest budget using an entry-level interface, a single microphone and headphones, according to LCCM’s breakdown of starter setups. Costs rise with extra microphones, monitors and acoustic treatment, but the essentials cover the biggest jump in quality.
What equipment do I need to start a recording studio?
The core list is a computer, a DAW, an audio interface, a microphone, and headphones or monitors, plus some basic acoustic treatment for the room. This combination is widely recommended as the practical starting point for home recording setups, and it covers everything from vocals to guitar.
Is owning a recording studio profitable?
Profitability depends heavily on local demand, your skills, and how you price sessions, none of which a general guide like this can state as a fixed figure. Many hobbyists start by recording their own music and only consider commercial work once their room and workflow are reliable.
How much does it cost to set up a music studio?
Costs scale with ambition: a basic rig for personal use costs far less than a space built to record other musicians regularly. Prioritising the interface and monitoring first, then adding acoustic treatment, tends to give the best improvement for the money spent, based on guidance from the Musicians’ Union.
Can I record loud instruments like drums without soundproofing my room?
Yes. Electronic drum kits, DI recording, and amp simulation software let you capture usable guitar and drum parts at low volume, which the Music Producers Guild recommends as the realistic approach for home hobbyists rather than expensive isolation.


Share:
Humbucker or Single Coil: How Construction Shapes Tone for UK Players