


- Poor intonation causes chords to sound out of tune up the neck despite proper tuning because it affects pitch accuracy across the fretboard. Correct setup involves preparing the guitar properly, using precise tools, and making incremental saddle adjustments while retuning consistently; regular checks enhance overall sound. Ultimately, perfect intonation is a compromise rooted in equal temperament; musicians should focus on ear training and strategic adjustments for the most musical results.
You’ve tuned every string to perfection, the tuner reads spot on, and yet the moment you play a chord up the neck, something sounds distinctly wrong. That familiar frustration is not a sign of failure — it is the classic symptom of poor intonation. Intonation is the hidden layer beneath simple tuning, and without it, even the finest guitar can sound like it belongs in a skip. This guide walks you through everything you need: what intonation actually means, how to prepare your instrument properly, a clear step-by-step adjustment process, troubleshooting tips, and advice for music educators who want to build this skill in their students.
Table of Contents
- What is intonation and why does it matter?
- What you need before you start
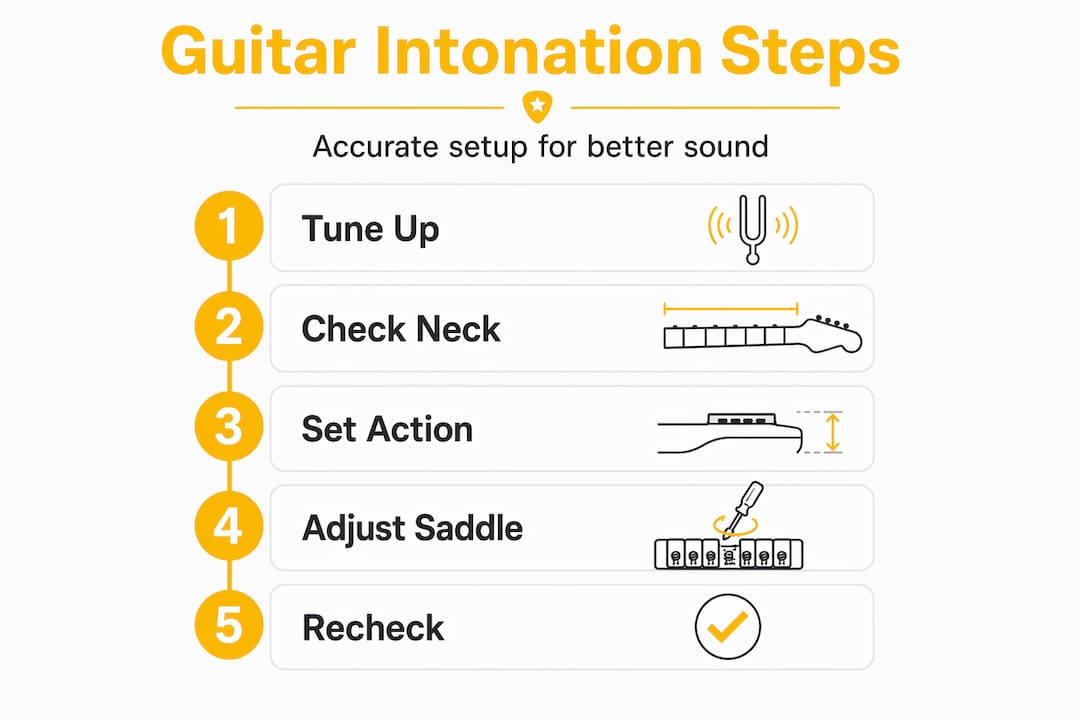
- Step-by-step guide: how to set your guitar’s intonation
- Troubleshooting, common mistakes, and final checks
- Teaching and practising intonation in group or lesson settings
- Our perspective: why perfect intonation is a myth and how to get the best results
- Get expert help or upgrade your gear at MusicStreet
- Frequently asked questions
Key Takeaways
| Point | Details |
|---|---|
| Preparation is key | Set neck relief and action before intonation to ensure accurate results. |
| Check at the 12th fret | Use the 12th-fret harmonic and fretted note to judge and adjust intonation. |
| Intonation is a compromise | Perfect pitch across every fret is impossible, so aim for best balance where you play most. |
| Retune and re-check | Always retune after each adjustment and verify your setup after changes. |
| Develop good habits | Regular checks and minor tweaks keep your guitar sounding its best. |
What is intonation and why does it matter?
Tuning and intonation are not the same thing, though many players use the words interchangeably. Tuning is the act of setting open strings to the correct pitch. Intonation, by contrast, is the accuracy of every note across the entire fretboard — from the first fret all the way up to the dusty end of the neck.
When you press down at the 12th fret, you should produce a note exactly one octave above the open string. If it rings sharp or flat, your intonation is off. The effect compounds as you move further up the neck, meaning chords that include higher fret positions can sound genuinely awful even on a guitar that reads perfectly in tune at the nut.
Why intonation matters goes far beyond aesthetics. Bad intonation creates real problems for:
- Learners who begin to doubt their own ears
- Teachers trying to demonstrate clean chord voicings
- Players recording at home who wonder why everything sounds muddy in the mix
- Guitarists performing in a band where intonation clashes are immediately audible to an audience
It is worth understanding why perfect intonation is so elusive on a standard guitar. The instrument is built around equal temperament, a tuning system that mathematically divides the octave into 12 equal semitones. The pentatonic scale and guitar tuning connects directly to this system, and the fixed fret positions are a series of educated compromises rather than acoustically perfect placements.
As GuitarCrafts notes, intonation is a compromise rather than mathematically perfect across every fret on standard fretted instruments using equal temperament.
This does not mean good intonation is impossible. It means you are aiming for the best possible balance — not an unattainable ideal. Once you accept this, the whole process becomes far less daunting.
What you need before you start
Jumping straight into saddle adjustments without proper preparation is the single biggest mistake beginners make. Think of intonation as the final coat of paint. You would not skip the priming and sanding and expect a flawless finish. The same logic applies here.
Start by gathering your tools. You will need:
- A chromatic tuner (clip-on or pedal, not a phone app — accuracy matters here)
- A screwdriver matched to your saddle adjustment screws (usually Phillips or flathead)
- Fresh strings — old, worn strings do not intonate accurately regardless of how carefully you adjust the saddle
- A stable workspace with good lighting
- A capo (optional, but useful for cross-referencing notes)
| Tool | Purpose |
|---|---|
| Chromatic tuner | Measures pitch accurately to the cent |
| Screwdriver | Adjusts saddle position on the bridge |
| Fresh strings | Ensures consistent string tension and pitch response |
| Capo | Helps verify intonation at different positions |
| Ruler or feeler gauge | Confirms action height before adjustment |
Before touching the saddle, check that your guitar’s neck relief and action are set correctly. Preparing your guitar in the right sequence protects all your subsequent work. If action is too high, fretting a note at the 12th fret stretches the string slightly sharp — and no saddle adjustment will fully compensate for that. Similarly, neck bow (known as relief) affects pitch accuracy all the way up the neck.

Understanding guitar setup basics makes it clear that intonation is always the final step. Tackle neck relief first, then action, and then — only then — move to intonation. If you later change the action, as the adjusting guitar action guide explains, you will need to re-check intonation all over again.
As GuitarCrafts confirms, intonation adjustment should be treated as a refinement step, and changes to other setup variables like neck relief and action require re-checking intonation afterward.
Pro Tip: Work on one string at a time. Complete the full check-and-adjust cycle for each string before moving on. Rushing through all six at once leads to errors that compound each other.
Step-by-step guide: how to set your guitar’s intonation
Here is where the actual work happens. Follow each step carefully and resist the urge to rush. Patience pays off enormously here.
-
String up and tune to pitch. Fit fresh strings and allow them to stretch properly. Tune the guitar to your standard pitch — most commonly concert A440 (that means A is tuned to 440Hz). Give each string a gentle tug and retune until the pitch stabilises.
-
Play the 12th fret harmonic. Lightly touch the string directly above the 12th fret wire (do not press down) and pluck. This produces a natural harmonic. Note the reading on your chromatic tuner.
-
Play the 12th fret fretted note. Now press the string down firmly at the 12th fret as you would when actually playing, and pluck again. Compare this reading to the harmonic.
-
Interpret the result. If the fretted note is sharp compared to the harmonic, the string length is too short — the saddle needs to move away from the nut (towards the back of the guitar). If the fretted note is flat, the string length is too long — the saddle needs to move towards the nut.
-
Make a small adjustment. Turn the saddle screw in small increments. Less is more. Overshooting is one of the most common errors and forces you to reverse the adjustment repeatedly.
-
Retune and re-check. Moving the saddle changes the string tension and therefore the pitch. Always retune to pitch before measuring again. This step is non-negotiable.
-
Repeat until harmonic and fretted notes match. When your tuner reads the same pitch for both, that string’s intonation is set. Move to the next string and repeat from Step 2.
As StewMac confirms, bridge saddle direction depends on whether the fretted 12th-fret note is sharp or flat compared with the 12th-fret harmonic. This is the fundamental logic behind every saddle adjustment you will ever make.
| Fretted note vs harmonic | Problem | Saddle direction |
|---|---|---|
| Fretted note is sharp | String length too short | Move saddle away from nut |
| Fretted note is flat | String length too long | Move saddle towards nut |
| Notes match | Intonation is set | No adjustment needed |
For a fully comprehensive setup process, refer to our detailed guide covering every stage from neck to bridge. If you need to brush up on tuning your guitar before you begin, that foundation is worth revisiting.
Acoustic guitars follow the same logic, but the saddle is often a single bone or synthetic piece rather than individual adjustable units. Adjustments on acoustics typically require light sanding of the saddle — a task best left to a luthier unless you are confident with the process. If you want to try DIY setup tips, our full walkthrough covers both electric and acoustic scenarios in detail.
Pro Tip: After each saddle movement, always retune before taking a new reading. Skipping this step is the most common source of confusion during intonation work — the numbers will appear inconsistent if the string is not properly at pitch before you measure.
Troubleshooting, common mistakes, and final checks
Even when you follow the steps correctly, intonation can still feel elusive. Here is how to verify your results and avoid the pitfalls that catch most players out.
Verify across multiple positions. Once you have set the 12th fret, play the 5th fret and the 7th fret and listen critically. They will not be perfect — remember the compromise — but they should sound noticeably better than before. If something still sounds wildly off at a specific position, recheck your action and neck relief before blaming the saddle.
The most frequent mistakes players make when setting intonation include:
- Not retuning after each saddle adjustment — the single most common error by far
- Using old strings — worn strings have uneven mass distribution and will never intonate accurately regardless of saddle position
- Adjusting multiple strings at once — creates a confusing situation where each string’s pitch affects your perception of the others
- Making large saddle movements — small, incremental adjustments are far more accurate and easier to reverse
- Ignoring action and neck relief first — without these being correctly set, no amount of saddle adjustment will fully resolve intonation problems
- Using an unreliable tuner — a standard guitar tuner is rarely precise enough; a dedicated chromatic tuner reading in cents is essential
“Intonation adjustment should be treated as a refinement step, and changes to other setup variables like neck relief and action require re-checking intonation afterward.”
Build the habit of checking intonation every time you change strings, not just when something sounds wrong. Regular checking means small drifts are caught early. Investing in quality precision tuning accessories — a reliable clip-on chromatic tuner is top of that list — makes this habit far easier to maintain consistently.
Teaching and practising intonation in group or lesson settings
Intonation is not just a setup task — it is an ear training discipline, and music educators play a vital role in building this awareness from the start. Many students spend years not realising that their guitar is fighting them because no one has ever explained what intonation is or why it matters.
Here is a practical framework for introducing intonation in lesson or group settings:
-
Establish a stable reference pitch. Start every session with every student tuning to the same reference. Use a tuner rather than relying on one student’s open string, which may itself be slightly off.
-
Demonstrate the harmonic vs fretted note comparison. Let students hear the difference on a well-set guitar first, then on a deliberately poorly set one. The contrast makes the concept immediately tangible.
-
Work on matching pitch before correcting it. Students who can hear that something is wrong develop better musical instincts than those who are simply told the number on a tuner is incorrect.
-
Use visual tuner feedback. A display that shows the needle or bar moving left and right helps visual learners immediately understand sharp and flat in a concrete way.
-
Set realistic expectations. Explain early that small imperfections are normal, and that improvement is the goal rather than instant perfection.
-
Record short examples. Recording a student playing a chord progression before and after intonation correction is one of the most powerful feedback tools available. The difference is usually startling.
Yamaha’s music educator guidance suggests that systematic intonation practice should start by teaching “in tune” as what you can match to a stable reference pitch, building gradually rather than expecting students to self-correct immediately.
The full resource on intonation in teaching provides further depth for educators looking to weave this into a structured curriculum.
Pro Tip: Record a thirty-second clip of each student playing the same chord sequence at the beginning and end of a half-term. The improvement in pitch accuracy over time is motivating for students and enormously useful for tracking progress.
Our perspective: why perfect intonation is a myth and how to get the best results
Here is something that years of working with guitars and players of every level has made abundantly clear: the obsession with perfect intonation can actually make you a worse musician. Chasing a mathematically ideal that does not exist on a standard fretted instrument wastes energy that would be far better spent developing your ear and your playing.
The equal temperament system that every standard guitar is built around is, at its core, a deliberate approximation. As GuitarCrafts states plainly, expect intonation to be a compromise rather than mathematically perfect across every fret. That is not a flaw. It is a feature — a system that allows one instrument to play in any key without retuning.
What this means practically is that the best intonation is the most useful intonation for your actual playing. If you play open chords and capo-based songs, optimise the lower positions. If you are a lead player spending most of your time above the 7th fret, bias your intonation slightly towards that range. There is no universal correct answer.
From our experience setting up guitars for players at every level, the most musical results come from players who set intonation correctly, accept the remaining imperfection, and then use their ears to compensate in real-time. Vibrato, slight finger position adjustments, and string choice all contribute to the perceived pitch of a note. Skilled players use all of these instinctively.
Explore our guide on finding your guitar tone if you want to go deeper into how setup decisions connect to your overall sound. The goal is always a guitar that inspires you to play more, not one that passes a theoretical test.
Get expert help or upgrade your gear at MusicStreet
Intonation work is genuinely satisfying once you get the hang of it, but there are moments when a professional setup makes all the difference. If your saddles are at their limits, your neck has a twist, or your acoustic saddle needs material removed, it is absolutely worth letting an expert take over.

At MusicStreet, we offer professional instrument setups alongside an expertly curated range of guitars and accessories. Whether you need a fresh set of strings, a quality chromatic tuner, or a full setup by one of our team, we have got you covered. Browse our full range of expert setups and gear online, or visit us in store in Huntingdon, Cambridgeshire, where you can try instruments in person and get hands-on advice. Free UK delivery is available on qualifying orders, so getting your guitar sounding its best has never been more straightforward.
Frequently asked questions
Is it possible to achieve perfect intonation on every fret?
No — standard fretted guitars use equal temperament, which is a deliberate mathematical compromise that prevents perfect intonation from being achievable across every single fret position.
How often should guitar intonation be checked?
Check intonation every time you change strings, adjust neck relief or action, or notice notes sounding off despite correct open-string tuning. As GuitarCrafts confirms, setup variable changes always require intonation to be rechecked afterward.
Can intonation be adjusted on acoustic guitars as well as electric?
Yes, but acoustic guitars typically have a single non-adjustable saddle rather than individual units per string, so corrections often require professional saddle shaping rather than a simple screw adjustment.
Do I need any special tools to set intonation?
A chromatic tuner and the correct screwdriver for your bridge are the essentials. Fresh strings and a stable, well-lit workspace make the process significantly more reliable and repeatable.
Why does my guitar still sound out of tune after intonation?
Several factors can persist beyond intonation: old or worn strings, excessive finger pressure bending the string sharp, action that is still too high, or inherent limitations in the equal temperament system that the instrument is built around.








Share:
Find the perfect guitar shop for expert advice and quality gear
Understand acoustic pickup types for richer guitar sound